Connecting Your Bank to LedgerMind via Akahu — Premium User Guide
Audience: LedgerMind Premium customers who have been enabled for the Akahu Personal Token integration. Time required: 15–25 minutes (one-time setup). What you will achieve: A secure, automatic daily sync of your New Zealand bank transactions into LedgerMind — no more CSV exports.
Table of Contents
- What This Integration Does
- Before You Start — What You Will Need
- Step 1 — Sign In to Akahu (Email Code)
- Step 2 — Open Developers & Verify Your Identity
- Step 3 — Set Up Two-Factor Authentication (MFA)
- Step 4 — Open Your Personal App (Developers)
- Step 5 — Connect Your Bank to Akahu
- Step 6 — Copy Your Two Tokens
- Step 7 — Paste the Tokens into LedgerMind
- Step 8 — Run Your First Sync
- Step 9 — Review Your Synced Data
- Day-to-Day Usage
- Security & Privacy
- Troubleshooting
- FAQ
1. What This Integration Does
Akahu is a New Zealand open-banking platform that lets approved applications read your bank transactions on your behalf — with your explicit consent and without ever seeing your banking password.
When you complete this guide, LedgerMind will be able to:
- Pull the last 24 months of transaction history from each connected bank account on first sync.
- Refresh new transactions every time you press Sync Now in LedgerMind.
- Show you a dedicated Akahu Sync dashboard with balances, transaction lists, CSV export, and search.
Important — Beta scope: During the beta, synced data is stored in a separate, read-only area inside LedgerMind. It does not automatically replace transactions you have imported via CSV. You can continue using both methods in parallel for reconciliation. A future release will let you "promote" synced transactions into your main ledger with automatic deduplication.
2. Before You Start — What You Will Need
Have the following ready before you begin:
- ✅ A computer or phone with a modern web browser (Chrome, Edge, Safari).
- ✅ Your personal email address (the same one you use to log in to LedgerMind — this is required for the beta allow-list).
- ✅ A mobile phone with an authenticator app installed. We recommend:
- Microsoft Authenticator (iOS / Android)
- Google Authenticator (iOS / Android)
- ✅ Your online banking login for the bank you want to connect (e.g. Kiwibank, ANZ, ASB, BNZ, Westpac).
- ✅ A valid NZ Driver's Licence or NZ Passport — Akahu performs a one-time identity check (handled by GBG Cloudcheck) before you can create a Personal App.
- ✅ About 15–25 minutes of uninterrupted time.
📌 Note for accountants: If you manage multiple entities (e.g. personal and company accounts), repeat this guide for each LedgerMind account separately. Each Akahu account is tied to one email.
Step 1 — Sign In to Akahu (Email Code)
Akahu uses passwordless sign-in. Instead of choosing a password, you enter your email and Akahu emails you a short verification code each time you log in.
- In your browser, go to https://my.akahu.nz.
- Enter your email address and click Continue / Send code.
- Open your inbox (within ~1 minute) and look for an email from Akahu containing a 6-digit verification code. If it does not appear, check your Spam / Junk folder.
- Copy the code, paste it into the Akahu page, and click Verify / Sign in.
🖼️ [SCREENSHOT #1] — Akahu sign-in page at my.akahu.nz with the email field visible.
🖼️ [SCREENSHOT #2] — The email-code entry screen showing the 6-digit code input (blur the actual code).
🖼️ [SCREENSHOT #3] — Akahu dashboard / home screen immediately after first sign-in.
💡 Tip: The code is valid for a short window only (usually 10 minutes). If it expires, just click Resend to get a new one.
Step 2 — Open Developers & Verify Your Identity
Before Akahu lets you create a Personal App, it requires a one-time identity check (handled by GBG Cloudcheck, a regulated NZ identity-verification provider). You only need to complete this once.
2.1 Open the Developers section
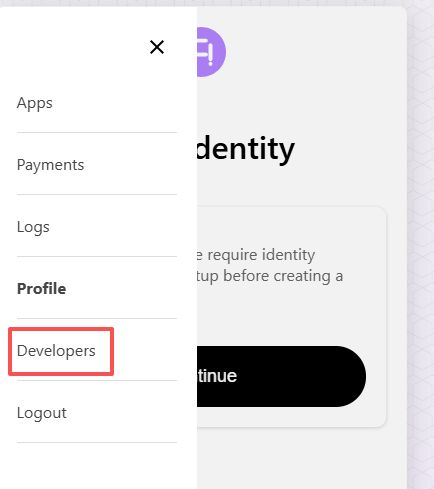
- While signed in to https://my.akahu.nz, click the menu icon (☰) in the top-left corner to open the sidebar.
- In the sidebar, click Developers.
🖼️ [SCREENSHOT #4] — Akahu's left sidebar with the "Developers" menu item highlighted (matches the screenshot showing Apps / Payments / Logs / Profile / Developers / Logout).
2.2 Start the identity check
When you open Developers for the first time, you will see a Verify Your Identity gate screen explaining that Akahu requires identity verification and 2FA setup before you can create a Personal App.
- Read the on-screen message.
- Click Continue.
🖼️ [SCREENSHOT #5] — Akahu's "Verify Your Identity" gate screen with the Continue button (text: "To enhance security, we require identity verification and 2FA setup before creating a personal app.").
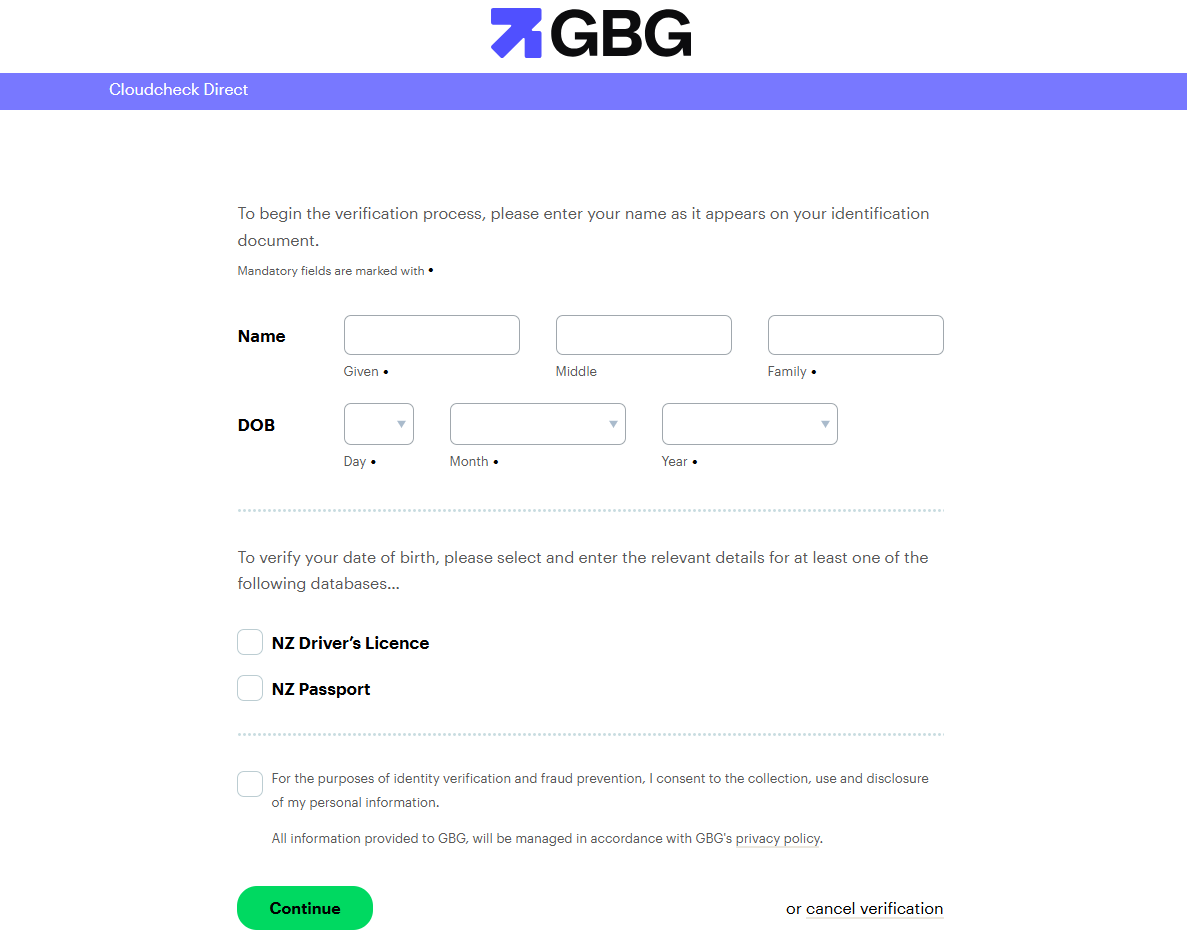
2.3 Complete the GBG Cloudcheck form
Clicking Continue opens a secure page hosted at
akahu.cloudcheck.co.nz (GBG's identity-verification service). You will
need to provide:
- Your full name exactly as it appears on your ID document - Given name (first name) - Middle name (if any) - Family name (surname)
- Date of birth — day / month / year.
- One form of NZ identification — tick one of:
- ☐ NZ Driver's Licence — you will then be asked for your licence
number and the version number (the small number near your
photo, e.g.
123). - ☐ NZ Passport — you will then be asked for your passport number and expiry date. - Tick the consent checkbox: "For the purposes of identity verification and fraud prevention, I consent to the collection, use and disclosure of my personal information."
- Click Continue.
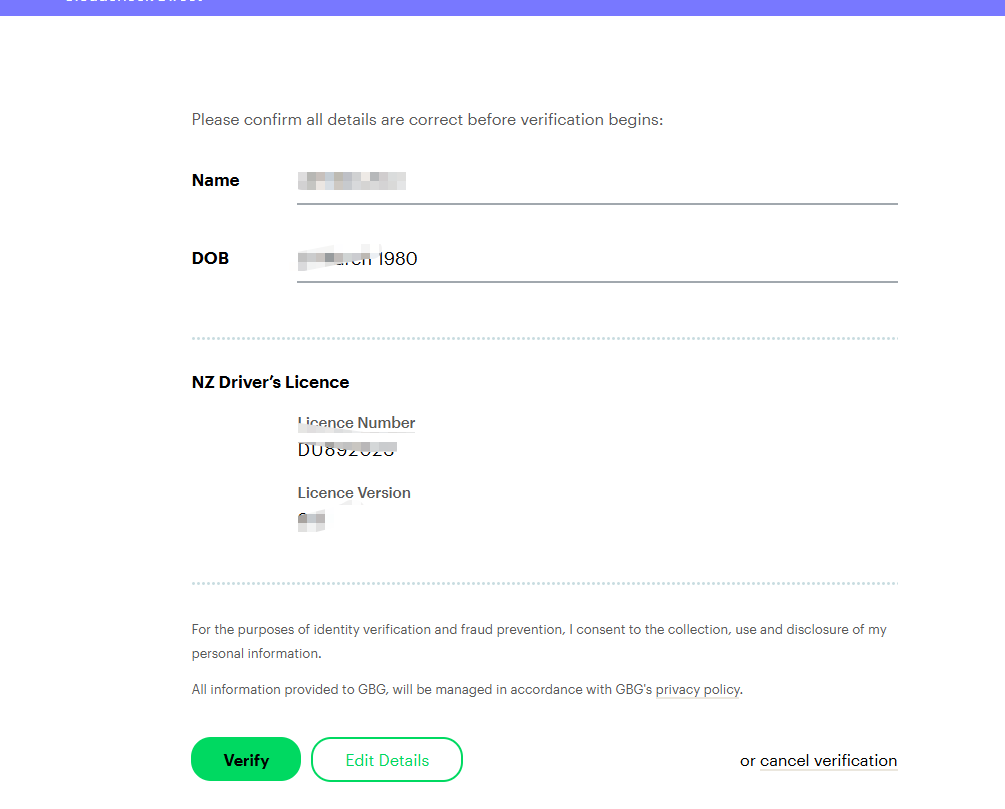
GBG will check your details against the relevant NZ government database (NZTA for driver's licences, DIA for passports). Verification usually completes within a few seconds.
🖼️ [SCREENSHOT #6] — The GBG Cloudcheck form (name / DOB / NZ Driver's Licence / NZ Passport options and consent checkbox). Blur or redact any personal information before sharing.
🖼️ [SCREENSHOT #7] — The "Verification successful" confirmation screen returned by Akahu after GBG completes the check.
❗ If verification fails: - Double-check that the name you entered matches the document character-for-character (including middle names). - Confirm the licence version number (it changes every time you renew your licence). - If it still fails, try the alternative document (passport instead of licence, or vice-versa). - As a last resort, contact Akahu support at support@akahu.nz.
🔐 Privacy note: GBG only confirms a match / no-match result. Your ID details are not stored in LedgerMind, and Akahu only retains the verification outcome — not your licence or passport number.
After identity verification succeeds, Akahu will guide you straight into the 2FA setup (Step 3 below). If for any reason you need to start 2FA manually later, return to Developers and you'll see the prompt again.
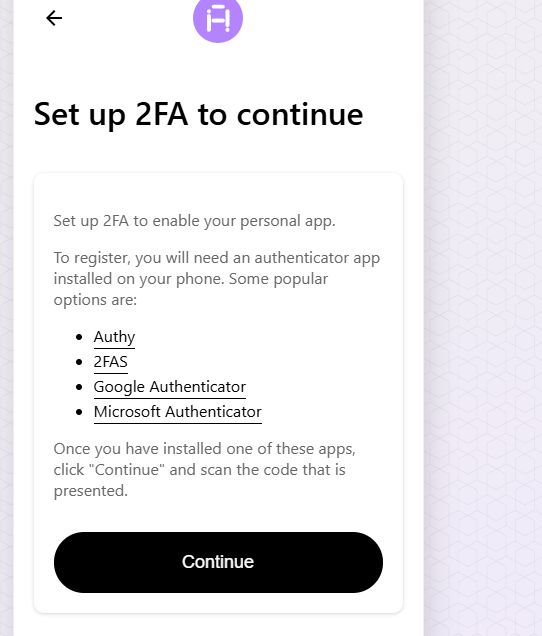
Step 3 — Set Up Two-Factor Authentication (MFA)
Akahu requires two-factor authentication before you can create a Personal App. This is a one-time setup per device.
3.1 Install an authenticator app
If you do not already have one, install Google Authenticator, Microsoft Authenticator, or Authy on your phone from the App Store or Google Play.
3.2 Start MFA setup in Akahu
After identity verification succeeds (Step 2), Akahu will display the Set up two-factor authentication screen automatically. If you closed the tab, go back to https://my.akahu.nz → sidebar → Developers, and you'll be prompted again.
- Read the on-screen instructions.
- Click Enable / Set up.
- Akahu will display a QR code on screen.
🖼️ [SCREENSHOT #8] — Akahu's "Set up two-factor authentication" intro screen with the Enable button.
🖼️ [SCREENSHOT #9] — The QR-code screen Akahu displays during 2FA setup. Blur or replace the QR code* before sharing this
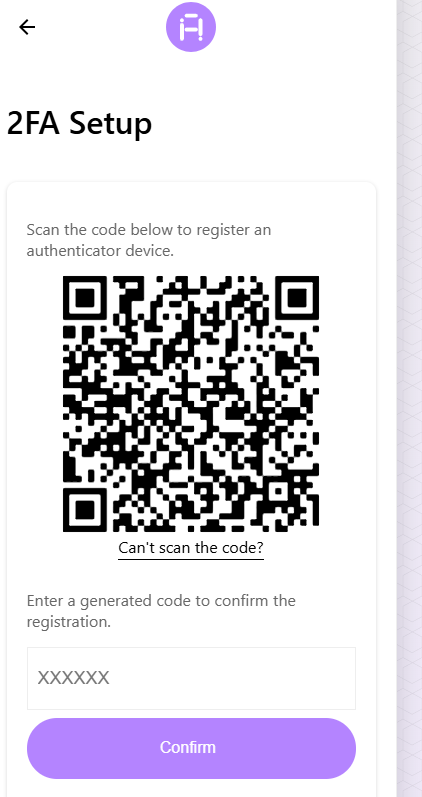
3.3 Scan the QR code
- Open your authenticator app on your phone.
- Tap the + (add account) button.
- Choose Scan a QR code.
- Point your phone's camera at the QR code on your computer screen.
- The app will instantly add an entry called something like "Akahu (your@email.com)" that shows a 6-digit code refreshing every 30 seconds.
3.4 Confirm with a code
- Type the current 6-digit code from your authenticator app into the Akahu confirmation box.
- Click Verify / Enable.
- Akahu will show recovery codes — a list of 8–10 one-time backup codes. Save these somewhere safe (password manager, printed copy in a locked drawer). You will need them if you ever lose your phone.
🖼️ [SCREENSHOT #10] — Akahu's "MFA successfully enabled" / recovery-codes screen. Blur the actual recovery codes before sharing.
⚠️ Do not skip the recovery codes step. Without them, losing your phone means losing access to your Akahu account permanently.
From now on, every time you sign in to Akahu you'll first enter the email code (Step 1) and then a fresh 6-digit code from your authenticator app.
Step 4 — Open Your Personal App (Developers)
Good news — your Personal App was created automatically when you finished identity verification + 2FA. You do not need to fill in any "Create a new app" form.
- In Akahu, open the sidebar (☰) and click Developers.
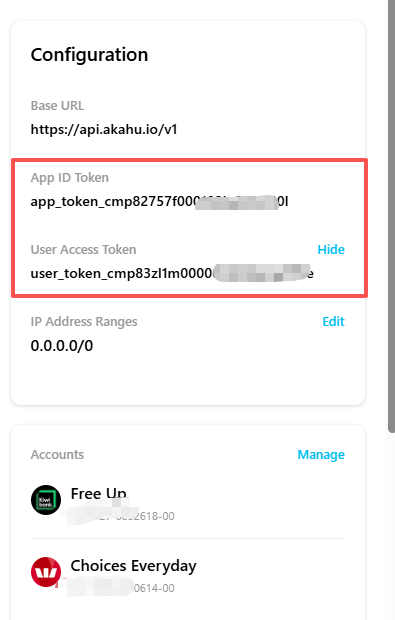
- You will now see a Configuration card with:
- Base URL:
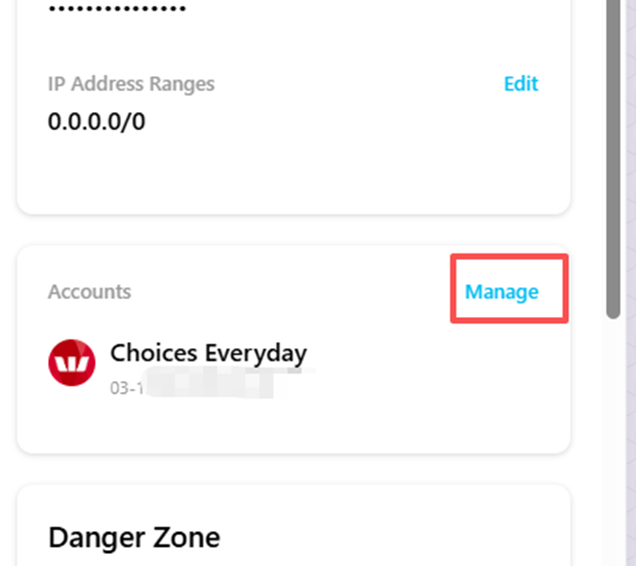
https://api.akahu.io/v1(informational only) - App ID Token: already populated, e.g.app_token_cmpg7t0rl000102l576b6ekg3- User Access Token: shows the placeholder text "Add accounts to generate a User Access token" - IP Address Ranges:0.0.0.0/0(leave as-is) - Scroll down to the Accounts card. It will currently say "No accounts connected" with an Add link on the right.
🖼️ [SCREENSHOT #11] — Akahu Developers page showing the Configuration card with App ID Token populated and the User Access Token field saying "Add accounts to generate a User Access token", and the Accounts card saying "No accounts connected" with an "Add" link.
💡 Why is the User Access Token empty? Akahu only issues a User Access Token once you connect at least one bank account to the Personal App. That's what the next step does.
🔐 Treat both tokens like passwords. Anyone with both tokens can read your bank transactions through Akahu (they cannot move money, but they can see everything). Do not share them in email, chat, or screenshots without blurring.
Step 5 — Connect Your Bank to Akahu
We will use Kiwibank as the example. The flow is similar for other banks (ANZ, ASB, BNZ, Westpac, TSB, etc.) — only the bank-login screens in the middle will look different.
5.1 Start a new connection
On the Developers page, find the Accounts card:
- If you have no accounts yet, click the Add link on the right.
- If you already have some accounts and want to add another, click Manage on the right.
🖼️ [SCREENSHOT #12] — The Accounts card on the Developers page, showing either "No accounts connected" with an Add link, or an existing connection (e.g. Westpac "Choices Everyday") with a Manage link in the top-right.
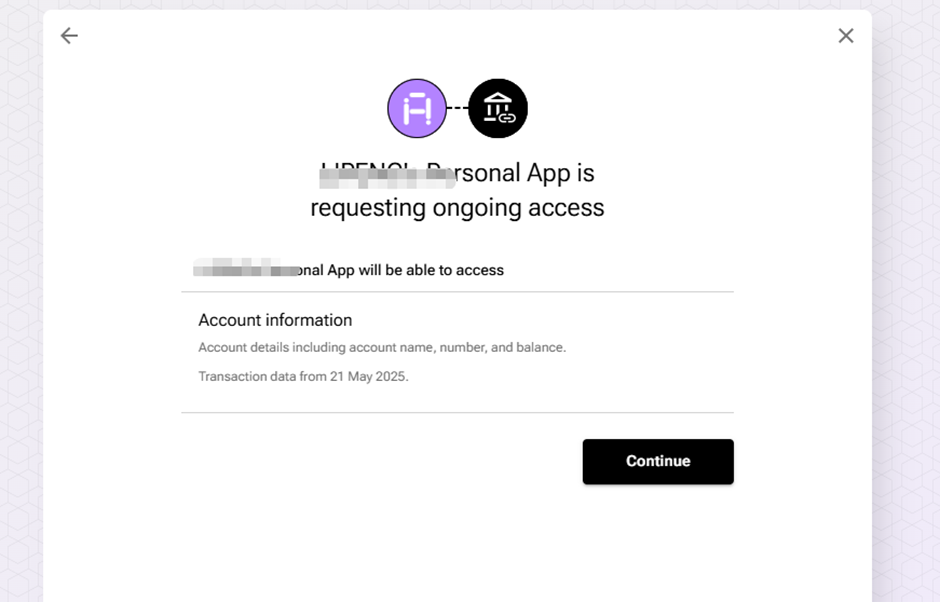
5.2 Approve the Personal App's ongoing access
Akahu will open a consent screen titled "\<Your name>'s Personal App is requesting ongoing access", listing what the app will be allowed to read:
- Account information — account details (name, number, balance).
- Transaction data from the connection date onward.
- Read what is being requested.
- Click Continue.
🖼️ [SCREENSHOT #13] — Akahu's "Personal App is requesting ongoing access" consent screen with the Continue button.
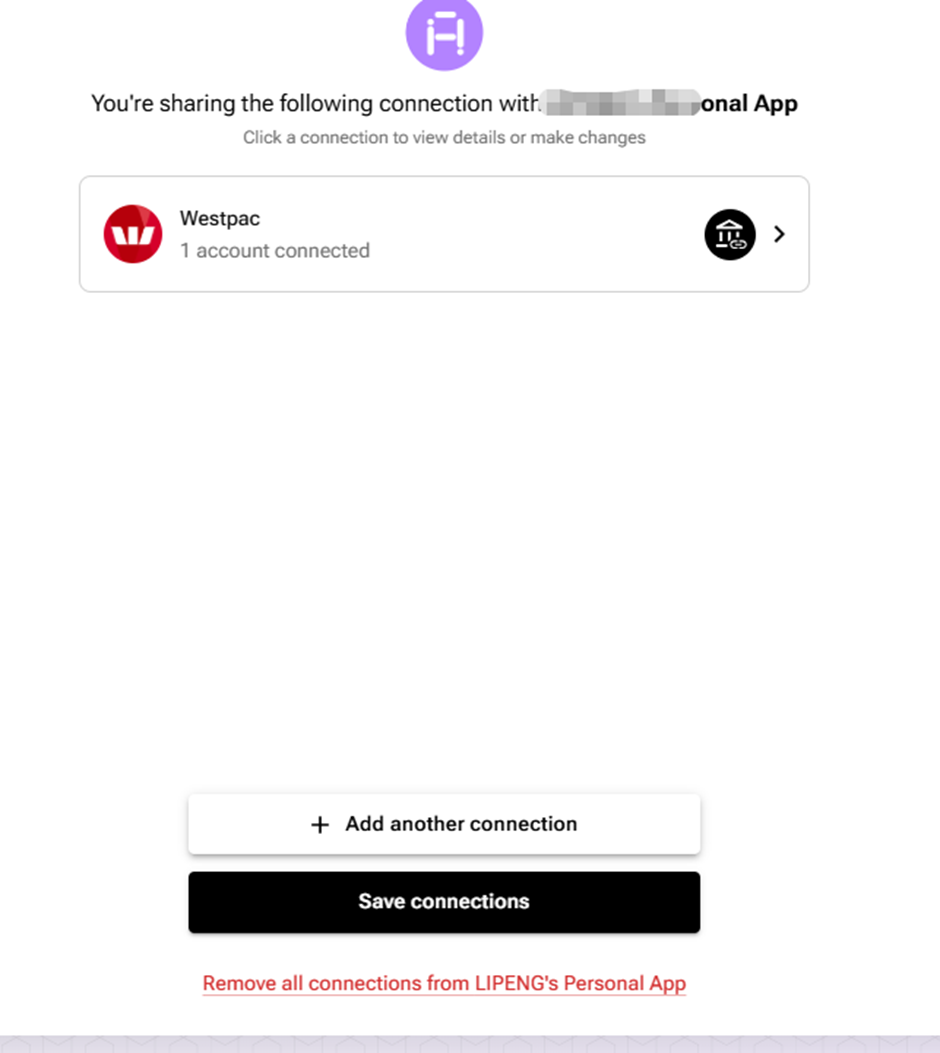
5.3 Add a new connection
Next you will see a screen titled "You're sharing the following connection with \<Your name>'s Personal App".
- If this is your first time, the connections list will be empty.
- If you have connected banks before, they will appear here.
Click + Add another connection.
🖼️ [SCREENSHOT #14] — The "You're sharing the following connection with Personal App" screen, with the + Add another connection and Save connections buttons visible.
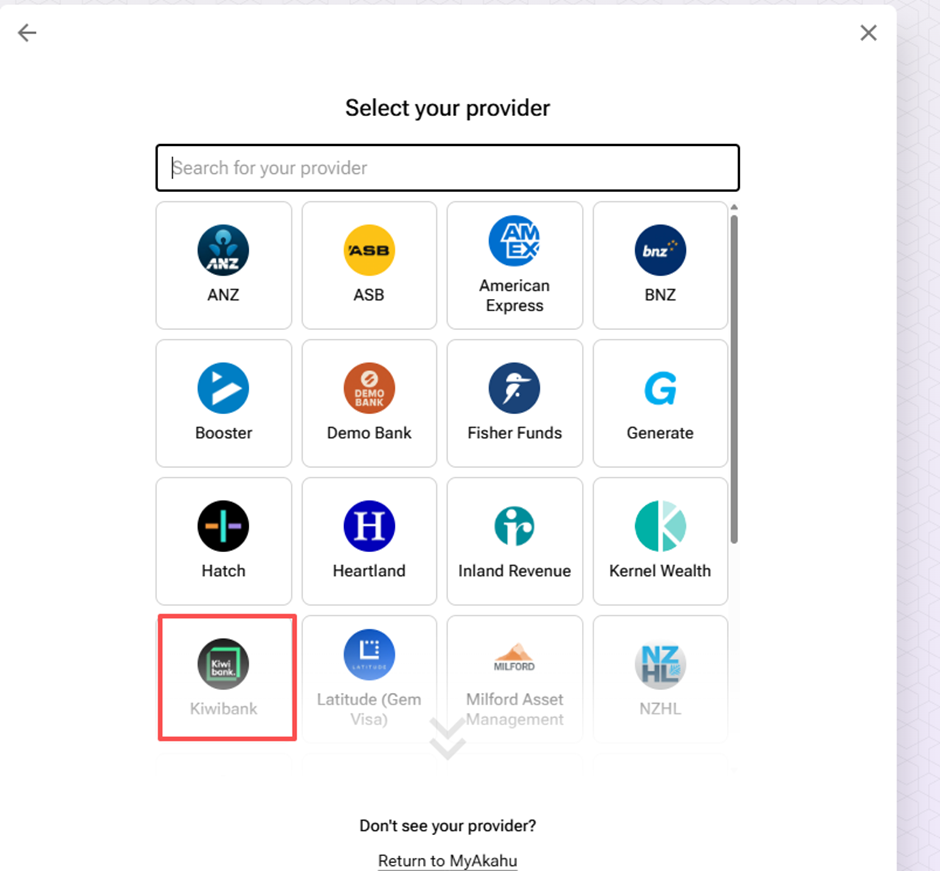
5.4 Select your bank
Akahu will show a grid titled "Select your provider" with all supported banks (ANZ, ASB, AMEX, BNZ, Booster, Demo Bank, Fisher Funds, Generate, Hatch, Heartland, Inland Revenue, Kernel Wealth, Kiwibank, Latitude, Milford, NZHL, and more — scroll if your bank is not visible).
Click your bank's logo — in this example, Kiwibank.
🖼️ [SCREENSHOT #15] — Akahu's "Select your provider" grid with the Kiwibank tile highlighted.
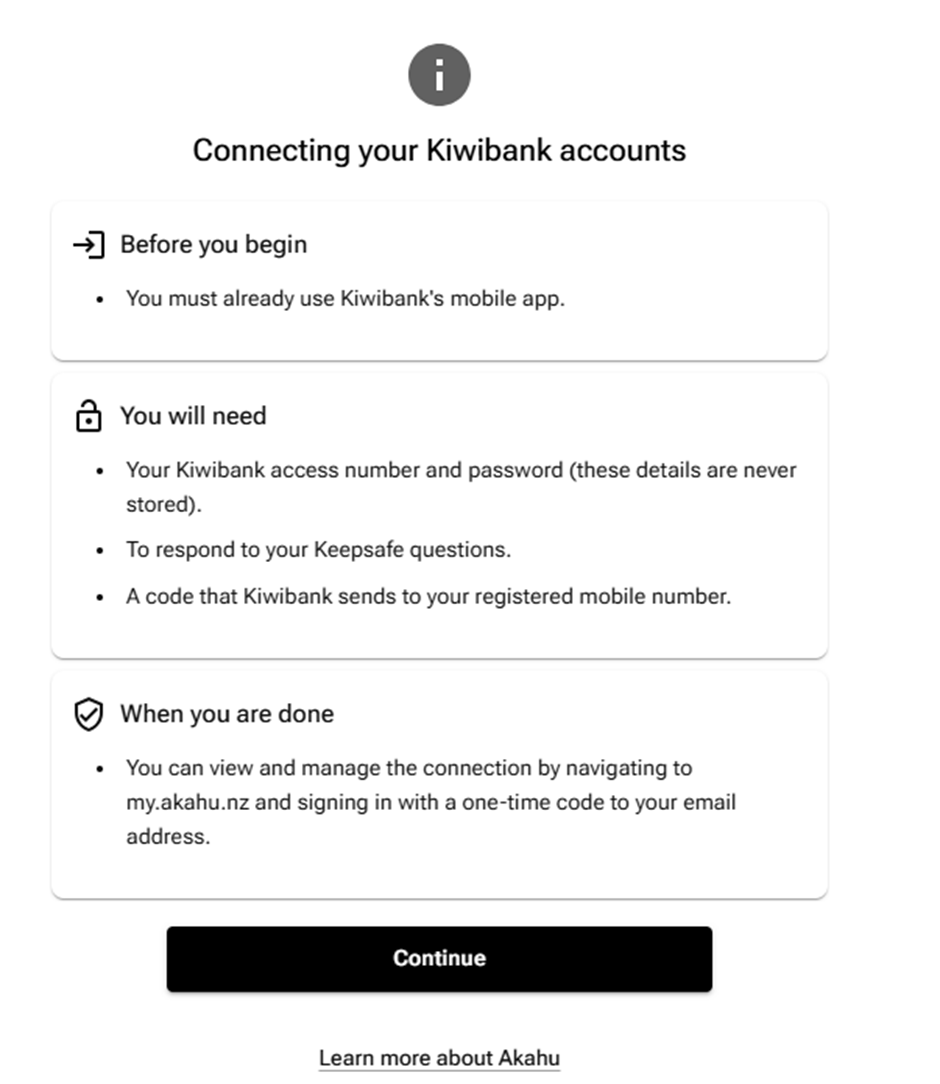
5.5 Read the bank-specific pre-flight screen
For Kiwibank, Akahu will show a "Connecting your Kiwibank accounts" information page explaining what you will need:
- ✅ You must already use Kiwibank's mobile app.
- ✅ Your Kiwibank access number and password.
- ✅ Your Keepsafe security answers.
- ✅ A SMS code Kiwibank will send to your registered mobile.
Read the page and click Continue when ready.
🖼️ [SCREENSHOT #16] — Akahu's "Connecting your Kiwibank accounts" pre-flight info screen with Continue button.
5.6 Enter your Kiwibank credentials
A page titled "Enter your Kiwibank credentials" appears.
- Type your Access Number.
- Type your Password.
- Click Submit.
🖼️ [SCREENSHOT #17] — Kiwibank credentials page (Access Number + Password + Submit). Blur both fields before sharing.
🔐 Security note: Akahu uses a screen-scraping connection for Kiwibank because Kiwibank does not yet provide an Open Banking API. Your credentials are submitted directly to Kiwibank and are not stored by Akahu or LedgerMind.
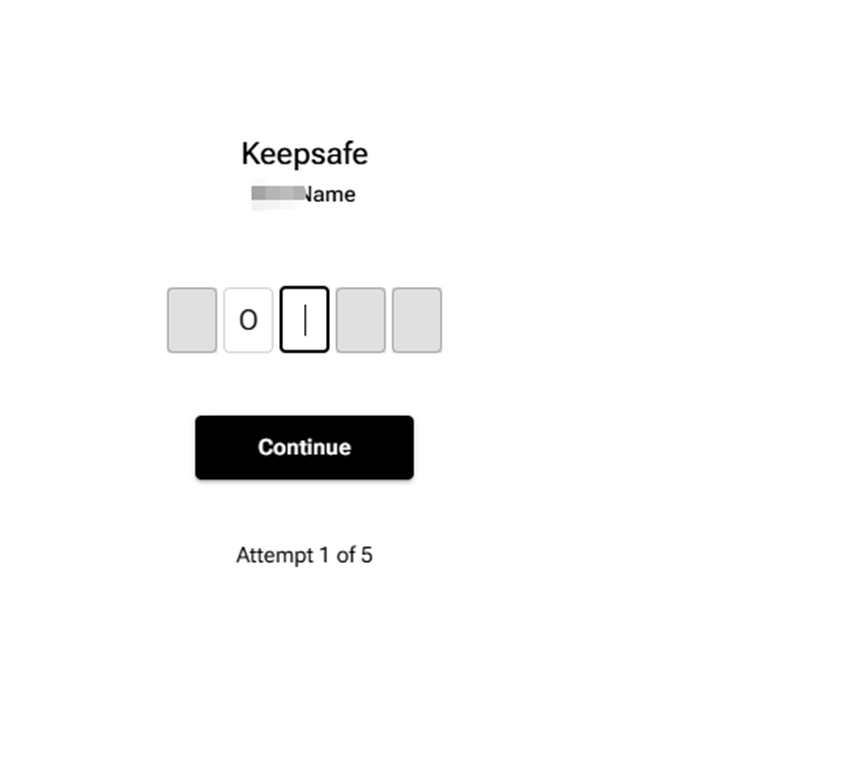
5.7 Answer your Keepsafe question
Kiwibank will prompt you with a Keepsafe challenge — it shows the name of one of your Keepsafe questions and asks you to enter specific letters of the answer (e.g. letter 2, letter 3 of a 5-letter answer).
- Type the letters into the boxes.
- Click Continue.
🖼️ [SCREENSHOT #18] — Kiwibank Keepsafe challenge screen with the letter boxes and Continue button (blur the question name).
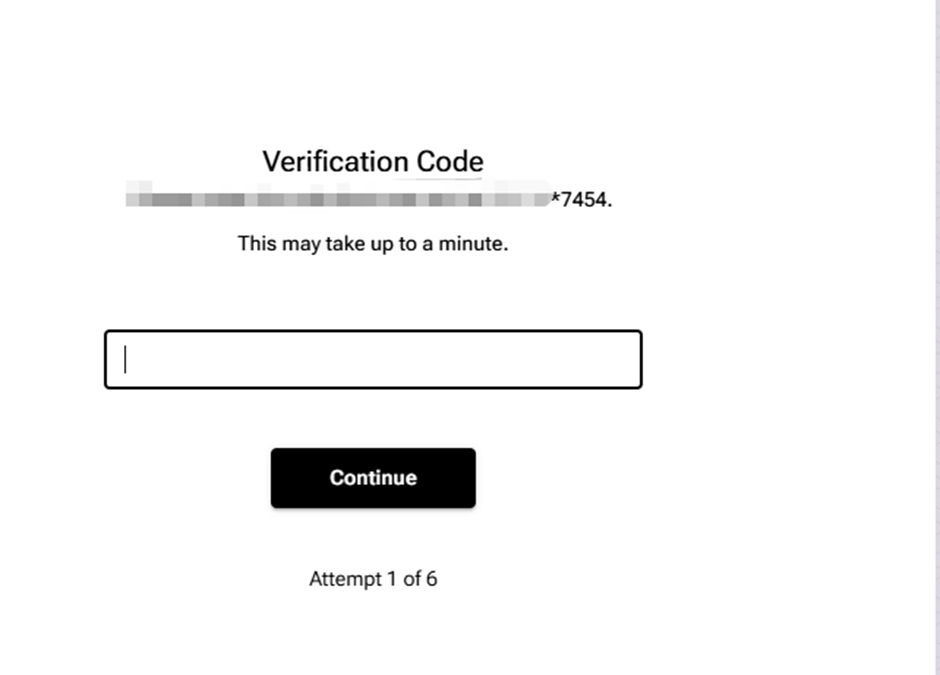
5.8 Enter the SMS verification code
Kiwibank will text a one-time verification code to your registered mobile number.
- Wait up to a minute for the SMS.
- Type the code into the box.
- Click Continue.
🖼️ [SCREENSHOT #19] — Kiwibank "Verification Code" entry screen with Continue button (blur the partial mobile number).
5.9 Choose which accounts to connect
Once Kiwibank has authenticated you, Akahu shows a list of your accounts under "Connect your accounts — Select the accounts you'd like to connect to \<Your name>'s Personal App".
- Tick the account(s) you want LedgerMind to read (e.g. Free Up), or click Select all to include every account.
- Click Connect accounts.
🖼️ [SCREENSHOT #20] — Akahu's "Connect your accounts" screen showing your Kiwibank accounts with tick-boxes and the Connect accounts button.
💡 Tip: Only connect accounts you genuinely want imported into LedgerMind. You can come back later and tick more accounts — just repeat the Manage flow.
5.10 Confirm and return to Akahu
You will see a "Final step" confirmation page with a green checkmark: "Your Kiwibank accounts are ready to be connected to \<Your name>'s Personal App."
- Click Continue.
- Akahu takes you back to the connections list, where you can either click + Add another connection to repeat this flow for another bank, or click Save connections to finish.
🖼️ [SCREENSHOT #21] — Akahu's "Final step" green-checkmark screen with Continue button.
💡 Connecting multiple banks: To also connect, say, Westpac, click + Add another connection and repeat steps 5.4 – 5.10. Each bank will have a slightly different login flow. LedgerMind groups transactions by bank automatically.
Step 6 — Copy Your Two Tokens
Now return to Developers (sidebar → Developers). The Configuration card will look different from before:
- App ID Token — populated (same as before, unchanged).
- User Access Token — now populated with a string starting with
user_token_.... Click Show to reveal it. - The Accounts card now lists every account you just connected (e.g. Free Up under Kiwibank, plus any banks you connected previously such as Westpac).
To copy each token:
- Click Show next to User Access Token to reveal the value.
- Click the token text (or the small copy icon, if present) and copy the entire string.
- Paste it temporarily into a safe place (a private note app you can close after — do not email or message it to anyone).
- Repeat for the App ID Token.
🖼️ [SCREENSHOT #22] — Akahu Developers page after connecting a bank — Configuration card showing both App ID Token and User Access Token populated (highlighted), and Accounts card listing the newly-connected account (e.g. Free Up under Kiwibank). Blur most of each token value before sharing.
You now have both tokens on your clipboard, ready to paste into LedgerMind.
Step 7 — Paste the Tokens into LedgerMind
- Open a new browser tab and go to https://www.ledgermind.co.nz.
- Sign in with your normal LedgerMind credentials.
- From the left sidebar, click Settings.
- Scroll down to the Bank Integration area.
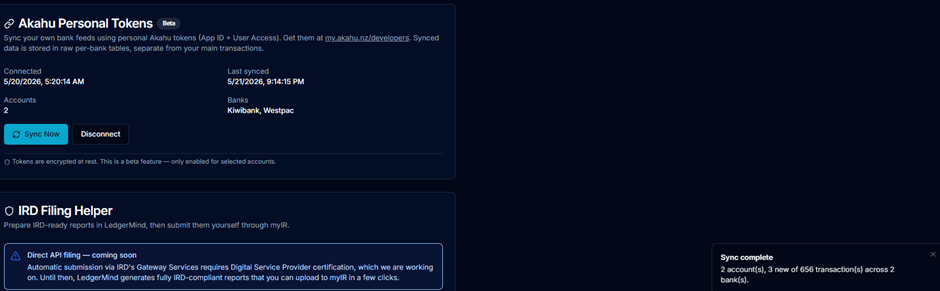
- Find the card titled 🔗 Akahu Personal Tokens (it has a small Beta badge next to the title).
🖼️ [SCREENSHOT #23] — The LedgerMind Settings page showing the "Akahu Personal Tokens (Beta)" card before any tokens have been entered. 6. Paste your App ID Token into the App Token field. 7. Paste your User Access Token into the User Token field. 8. Click Connect.
🖼️ [SCREENSHOT #24] — The same card with the two tokens pasted in (blur the actual tokens), cursor hovering over "Connect".
If the tokens are valid, LedgerMind will:
- Show Connected —
. - List the number of bank accounts it found.
- Display the bank name(s) (e.g. Kiwibank, Westpac).
🖼️ [SCREENSHOT #25] — The Akahu Personal Tokens card immediately after a successful connection — showing Connected timestamp, Accounts count, and Banks list (like the example in the screenshot showing "1 / Westpac").
❗ If you see an error ("Invalid token" or "Akahu rejected the credentials"), double-check that you copied the entire token (they are long — easy to miss the last character) and that you pasted them into the correct field. Then try Connect again.
Step 8 — Run Your First Sync
Tokens stored — now pull your bank data.
- Still on the Akahu Personal Tokens card, click Sync Now.
- The button spinner will spin for between 10 seconds and a few minutes, depending on how many transactions exist in the last 24 months.
- When it finishes, a green pop-up appears in the bottom-right corner:
Sync complete N account(s), M new of M transaction(s) across K bank(s).
🖼️ [SCREENSHOT #26] — The "Sync complete" toast notification in the bottom-right corner of the screen (like the example showing "1 account(s), 653 new of 653 transaction(s) across 1 bank(s)").
The first sync usually returns all transactions of the last 24 months. Subsequent syncs only pull new transactions since the last sync, so they are very fast.
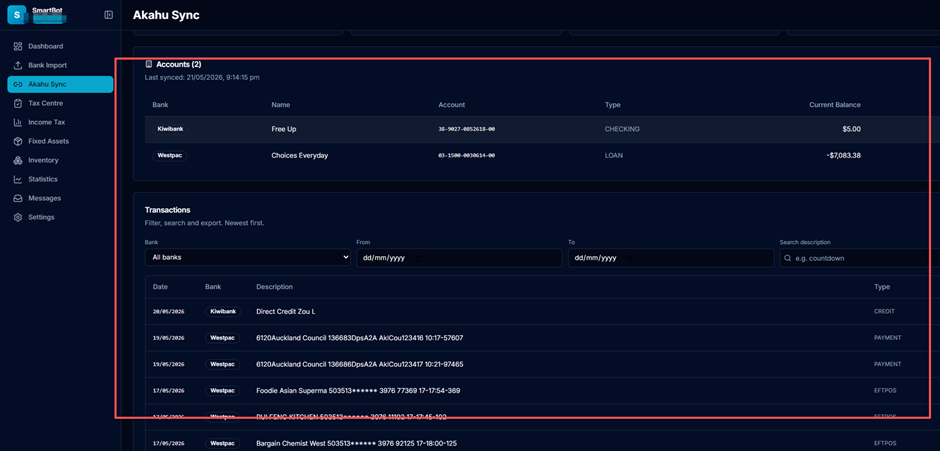
Step 9 — Review Your Synced Data
LedgerMind now has a dedicated read-only page for browsing what Akahu returned.
- In the left sidebar, click Akahu Sync (it appears between Bank Import and the other sections — only visible to allow-listed beta users).
- The page shows: - Four KPI cards at the top — total transactions, money in, money out, and net total (these recalculate live as you filter). - Accounts table — one row per connected bank account with current balance and available balance. - Transactions table — newest first, paginated 25/50/100/200 per page.
- Use the filter bar to narrow down: - Bank — filter to a single bank. - From / To — restrict to a date range. - Search description — find e.g. "countdown" or "salary".
- Click Export CSV to download the filtered set as a CSV file (suitable for Excel, Google Sheets, or your accountant).
- Click Sync Now at the top of this page any time you want to pull the latest transactions without going back to Settings.
🖼️ [SCREENSHOT #27] — Full Akahu Sync page with KPIs, Accounts table, filters, and Transactions table populated.
Day-to-Day Usage
| Task | Where in LedgerMind |
|---|---|
| Pull latest transactions | Akahu Sync → Sync Now (or Settings → Akahu Personal Tokens → Sync Now) |
| Reconcile against a CSV import | Compare the Akahu Sync page side-by-side with the main Bank Import page |
| Export for your accountant | Akahu Sync → Export CSV (after applying filters) |
| Add another bank | Go back to Akahu → Connections → Add new connection. The next Sync Now in LedgerMind will pick up the new accounts automatically — no need to re-enter tokens. |
| Disconnect | Settings → Akahu Personal Tokens → Disconnect — this removes the encrypted tokens from LedgerMind. Your synced history stays unless you tick "purge data". |
💡 Recommended cadence: Run a sync once a week (e.g. every Monday morning) during GST periods, and every day during the week before a return is filed.
Security & Privacy
LedgerMind takes the safety of your banking data seriously:
- 🔐 Your bank password never leaves your bank. You only enter it on your bank's own website during the Akahu consent step.
- 🔐 Tokens are encrypted at rest inside LedgerMind using AES-grade encryption. They are decrypted only in memory at sync time.
- 🔐 Tokens give read-only access. They cannot be used to move money, change details, or log in to your bank.
- 🔐 You can revoke at any time by clicking Disconnect in LedgerMind, or by deleting the Personal App in Akahu, or by revoking the connection from your bank's online banking portal.
- 🔐 Beta data isolation. During the beta, Akahu-synced transactions live in a separate area and never silently merge into your main ledger — you stay in control.
- 🔐 No third-party sharing. Akahu data is only ever used to power your own LedgerMind workspace.
Troubleshooting
"Invalid token" or "Akahu rejected the credentials"
- Verify that you copied the full token — these strings are long and easy to truncate.
- Confirm you didn't swap the App Token and the User Token fields.
- Tokens are tied to your Akahu account; make sure you are pasting from the same Akahu account whose bank you want to read.
"Personal Akahu integration is not enabled for this account"
- The Akahu Personal Token integration is invite-only during beta. Contact contact@ledgermind.co.nz with your LedgerMind email address and we'll enable it.
Sync runs but returns 0 transactions
- Make sure the connection in Akahu (Step 5) succeeded and lists at least one account under your bank.
- Check that the bank-side consent included transactions (not only balance).
- Some banks limit history to the past 12 months; older data may simply not be available.
"Sync failed — Akahu API error: rate limit"
- Akahu temporarily throttles requests. Wait 60 seconds and try again.
I lost my phone — I can't get a 2FA code
- Use one of the recovery codes you saved in Step 3.4 to sign in.
- Once signed in, go to Security settings, disable MFA, and re-enable it by scanning a new QR code on your replacement phone.
- If you've also lost the recovery codes, contact Akahu support at support@akahu.nz.
I want to remove my data completely from LedgerMind
- Go to Settings → Akahu Personal Tokens → Disconnect and tick Purge synced data. This deletes all encrypted tokens and all synced transactions from the Akahu raw tables. Your main ledger (CSV-imported transactions) is not affected.
FAQ
Q: Does this replace my CSV imports? A: Not during the beta. The two paths run side-by-side so you can reconcile. A future release will give you a "Promote to main ledger" button with automatic de-duplication.
Q: Will my transactions be duplicated?
A: No. Akahu-synced data is stored in dedicated tables and is not
inserted into your main transactions ledger automatically. Your GST,
income tax, and reports still come from your CSV-imported / manually
entered data until you decide to merge.
Q: How often does Akahu pull from my bank? A: Akahu refreshes data on its own schedule (typically daily). When you press Sync Now, LedgerMind asks Akahu for whatever is current on Akahu's side at that moment.
Q: Can I use the same Akahu account for multiple LedgerMind accounts? A: Technically yes — but each Akahu Personal App's User Token is one "identity". For clean separation between entities, create separate Akahu accounts (one per entity) and a Personal App in each.
Q: How long are the tokens valid? A: Akahu User Tokens are long-lived but you can revoke them at any time. If you ever rotate them (re-issue from the developer page), simply Disconnect in LedgerMind and paste the new pair.
Q: What does Akahu cost me? A: Personal apps are free for personal use under Akahu's policy. There is no additional charge from LedgerMind on top of your Premium plan.
Q: Which banks are supported? A: All major NZ retail banks Akahu supports today — Kiwibank, ANZ, ASB, BNZ, Westpac, TSB, Heartland, Co-operative Bank, Rabobank, and others. See Akahu's site for the live list.
Need More Help?
- 📧 LedgerMind support: contact@ledgermind.co.nz
We'd love to hear from you — your feedback shapes how we graduate this beta into a flagship feature.