Scanning a receipt into your books
Photograph a receipt and let the AI do the bookkeeping — including the spending you paid for personally, which your bank feed can never see.
Starter plan+ · 6 min read · Updated August 2026
1. What this is for
Your bank statement only shows money that left the business account. But a lot of real business spending never touches it — you were out, you used your own card, and the receipt went in your pocket. That spending is still deductible, the GST on it is still claimable, and IRD still expects you to keep the receipt for seven years. Scan Receipt closes that gap: one photo becomes a correctly coded, fully evidenced entry, and LedgerMind works out that the company now owes you the money back.
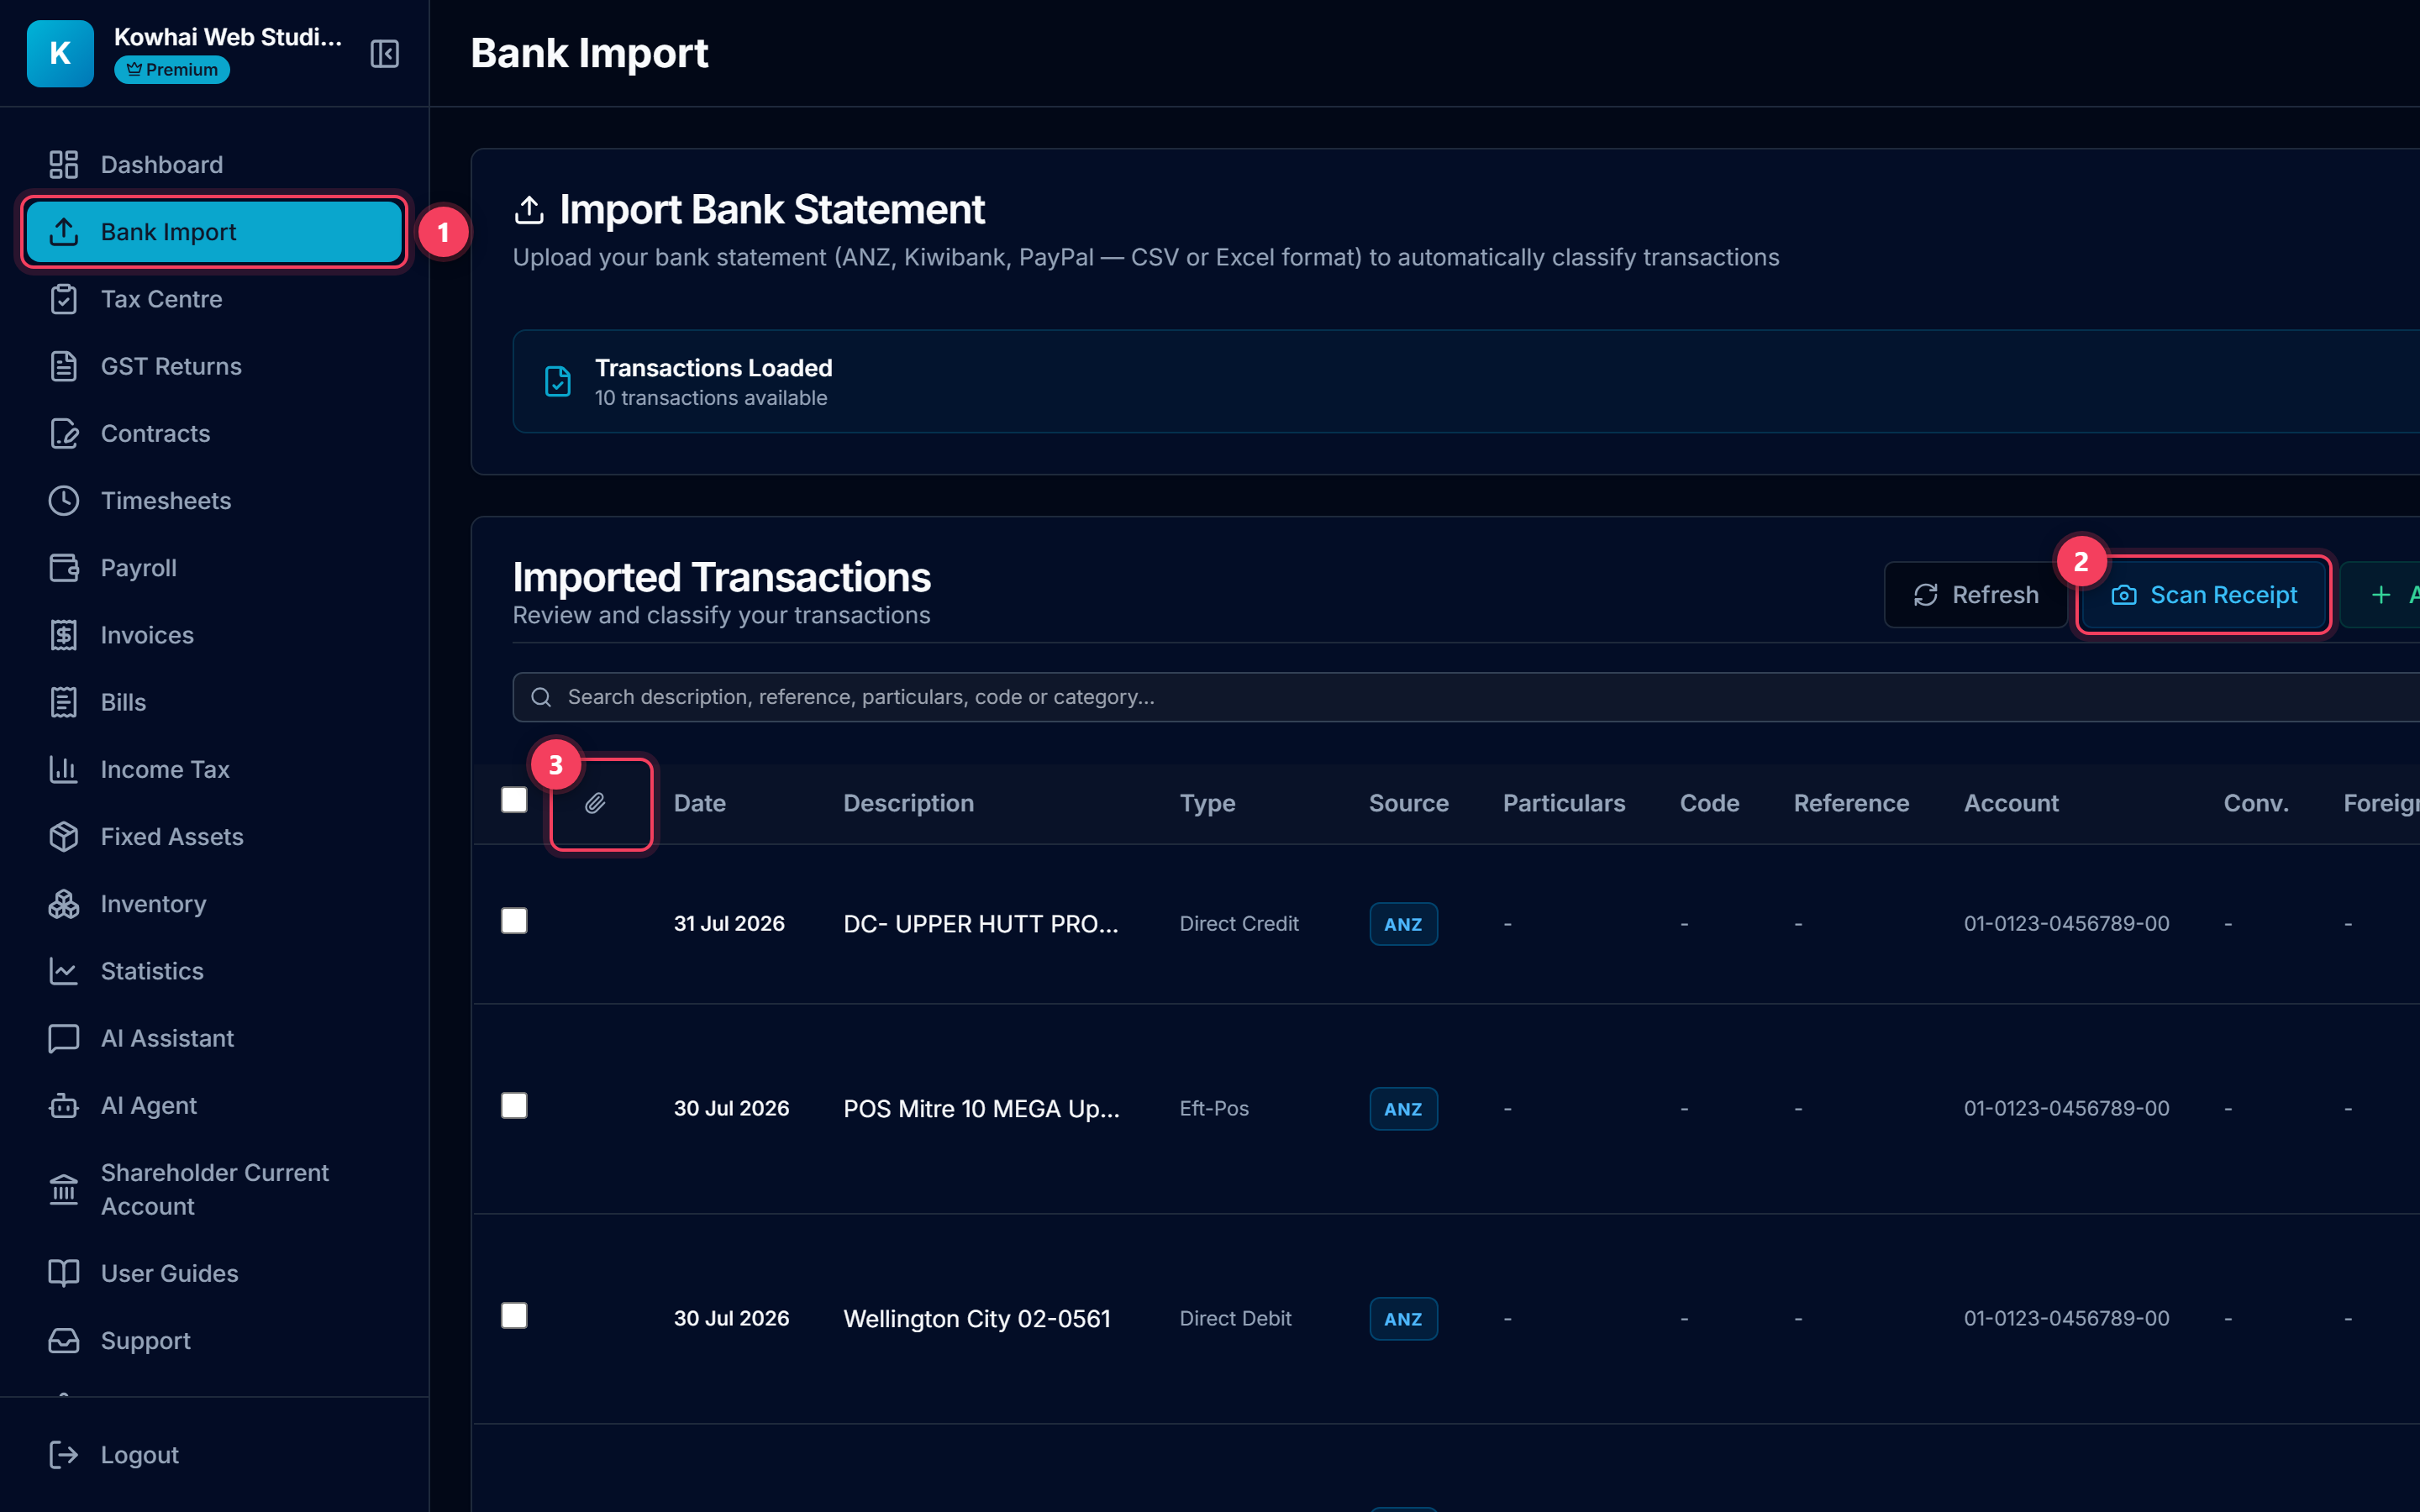
- Open Bank Import from the left sidebar — receipts live alongside your bank transactions, not in a separate pile.
- Scan Receipt starts the wizard. It sits next to Add Entry, but it is a different job: Add Entry is for typing figures in, Scan Receipt is for handing over a photo.
- The paperclip column shows which entries have a receipt behind them. Green means the evidence is stored; a faint clip on hover means that entry has none yet and you can attach one.
Tip: Nothing in this wizard is written to your books until you press Confirm in step 3. You can back out at any point.
2. Photograph the receipt
Lay the docket flat and get the whole thing in frame. The shop name, the date and the total have to be readable — everything else the AI can cope with. One receipt per photo.
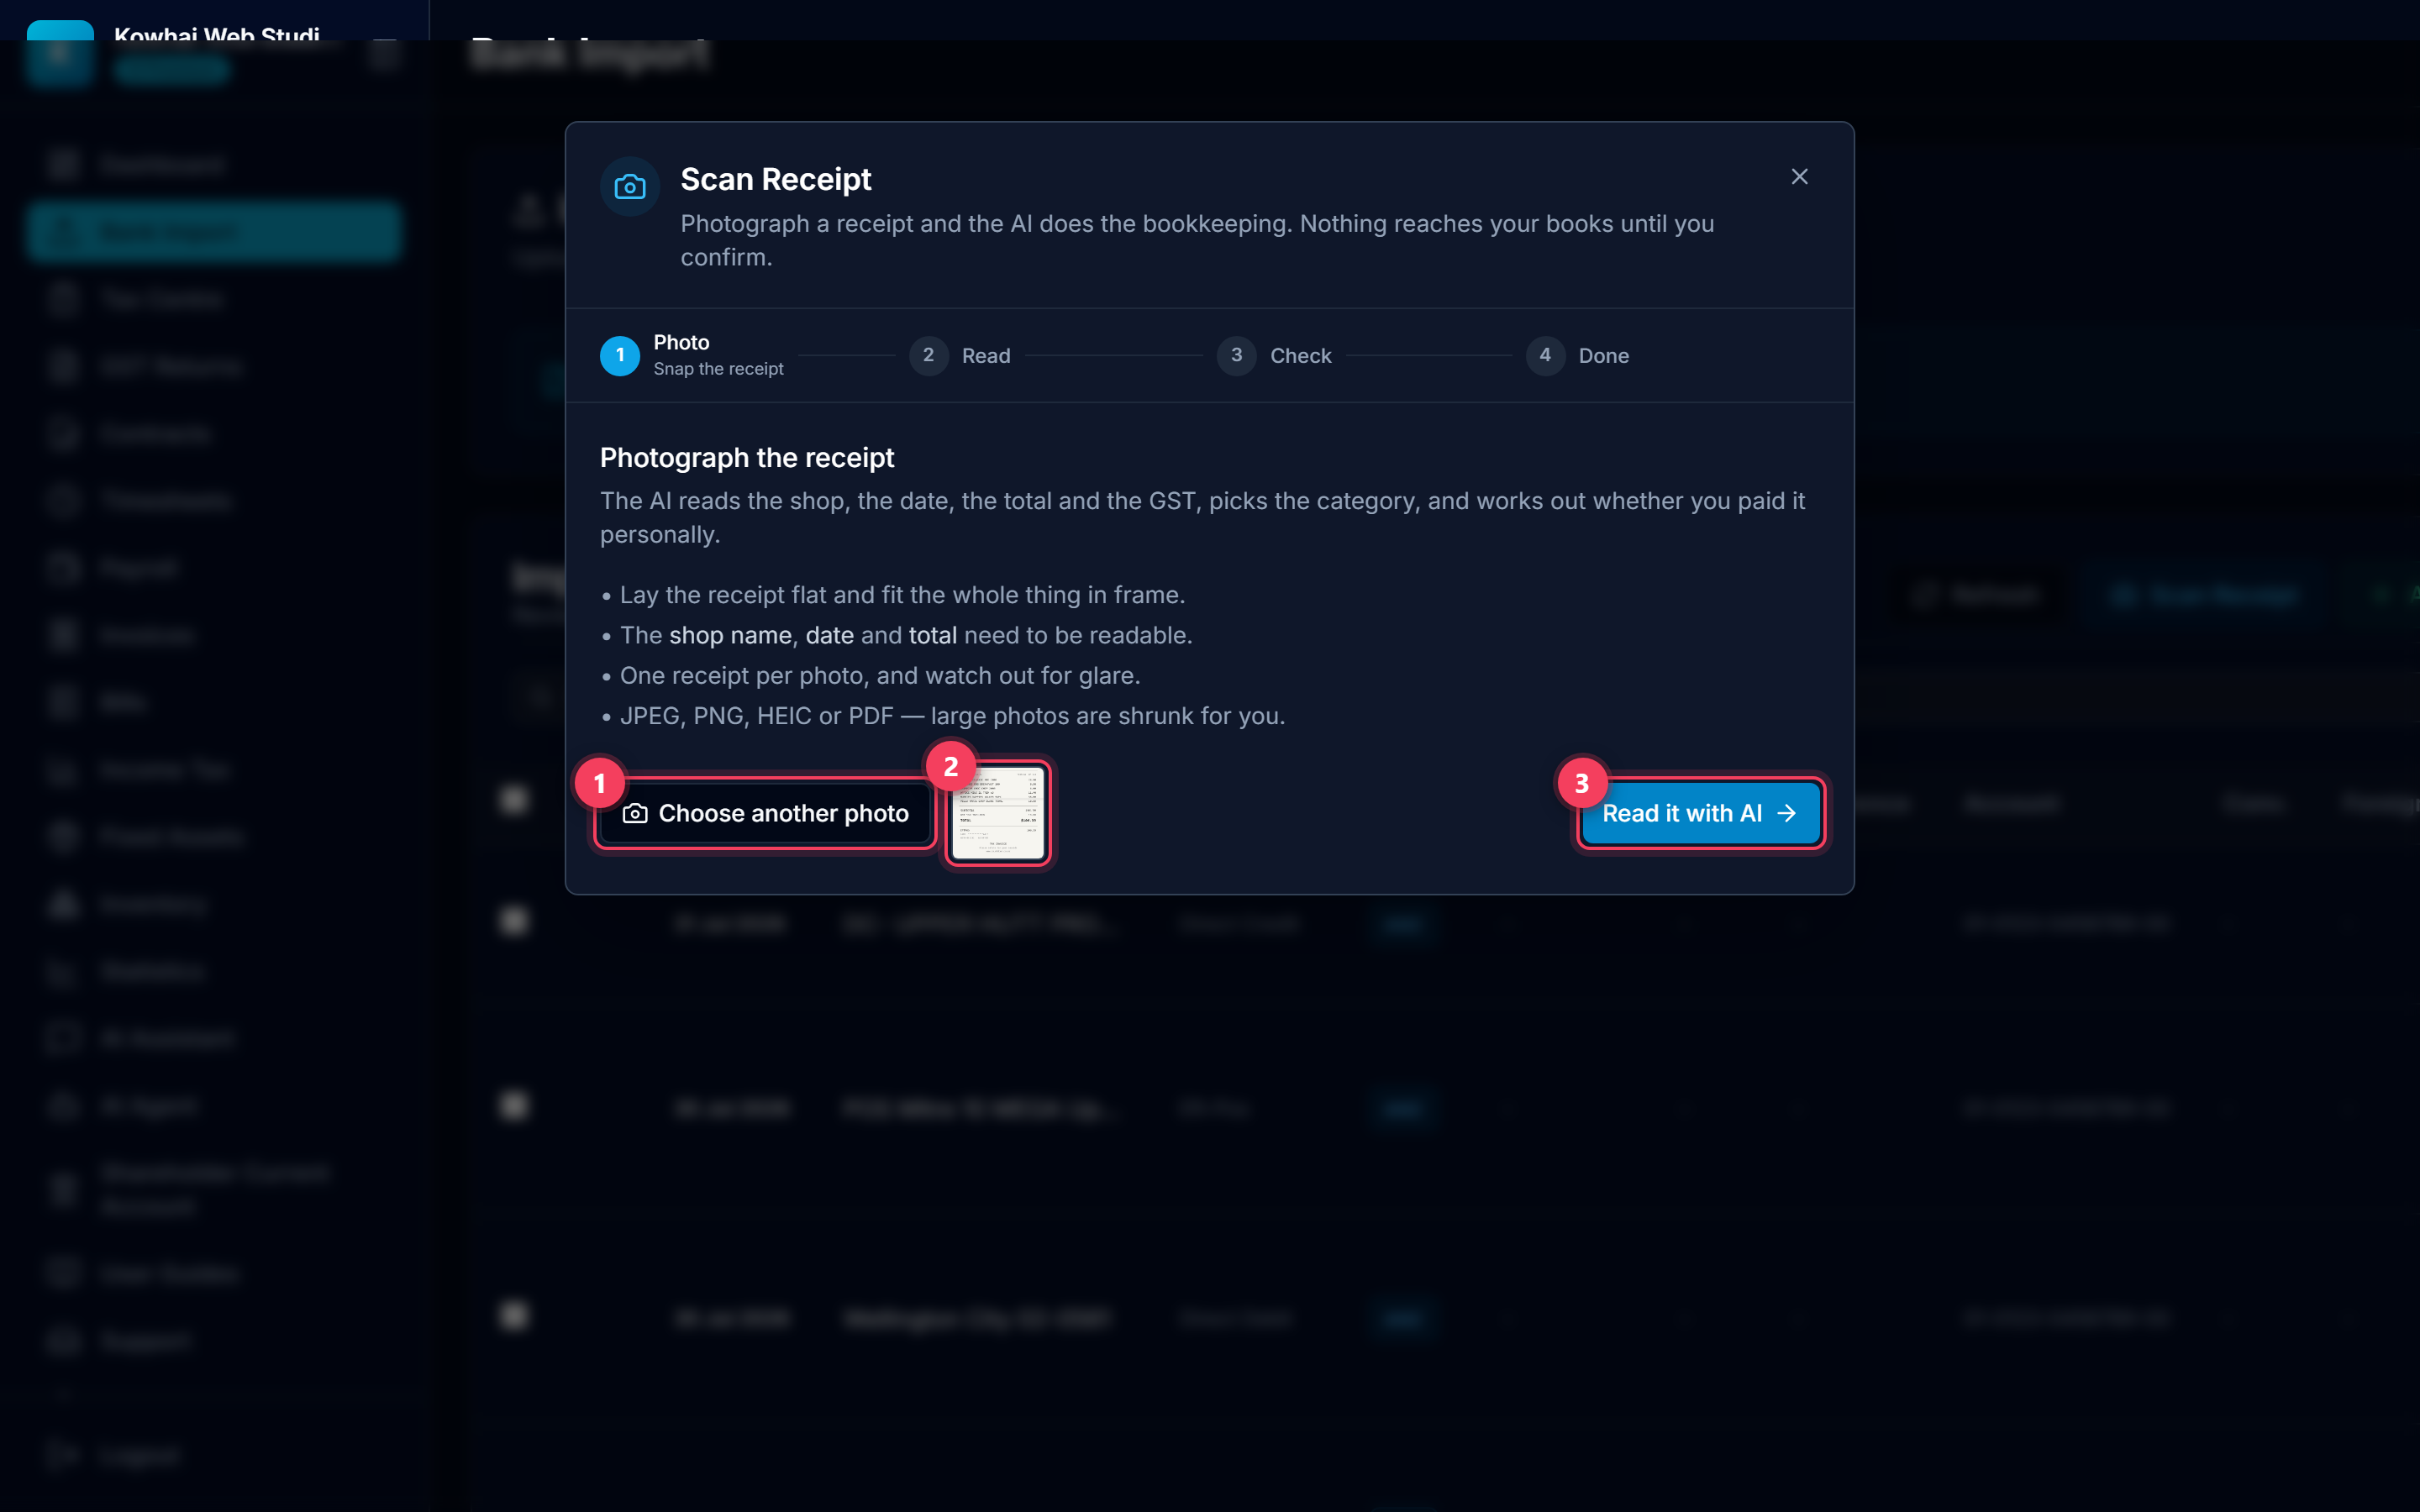
- Choose a photo — on a phone this opens the camera directly.
- The thumbnail confirms the right image loaded. Large photos are shrunk for you, so a 6 MB camera shot is fine.
- Read it with AI sends the image off to be read. This takes a few seconds.
Tip: JPEG, PNG, HEIC and PDF all work. A PDF (an emailed tax invoice, say) is stored as evidence but not read automatically — type the four figures in yourself.
3. See what the AI worked out
The Check step is the heart of the feature. It does not just dump fields at you — it tells you in plain words whose money this was and how you get it back, then pre-fills everything so the normal case is one click.
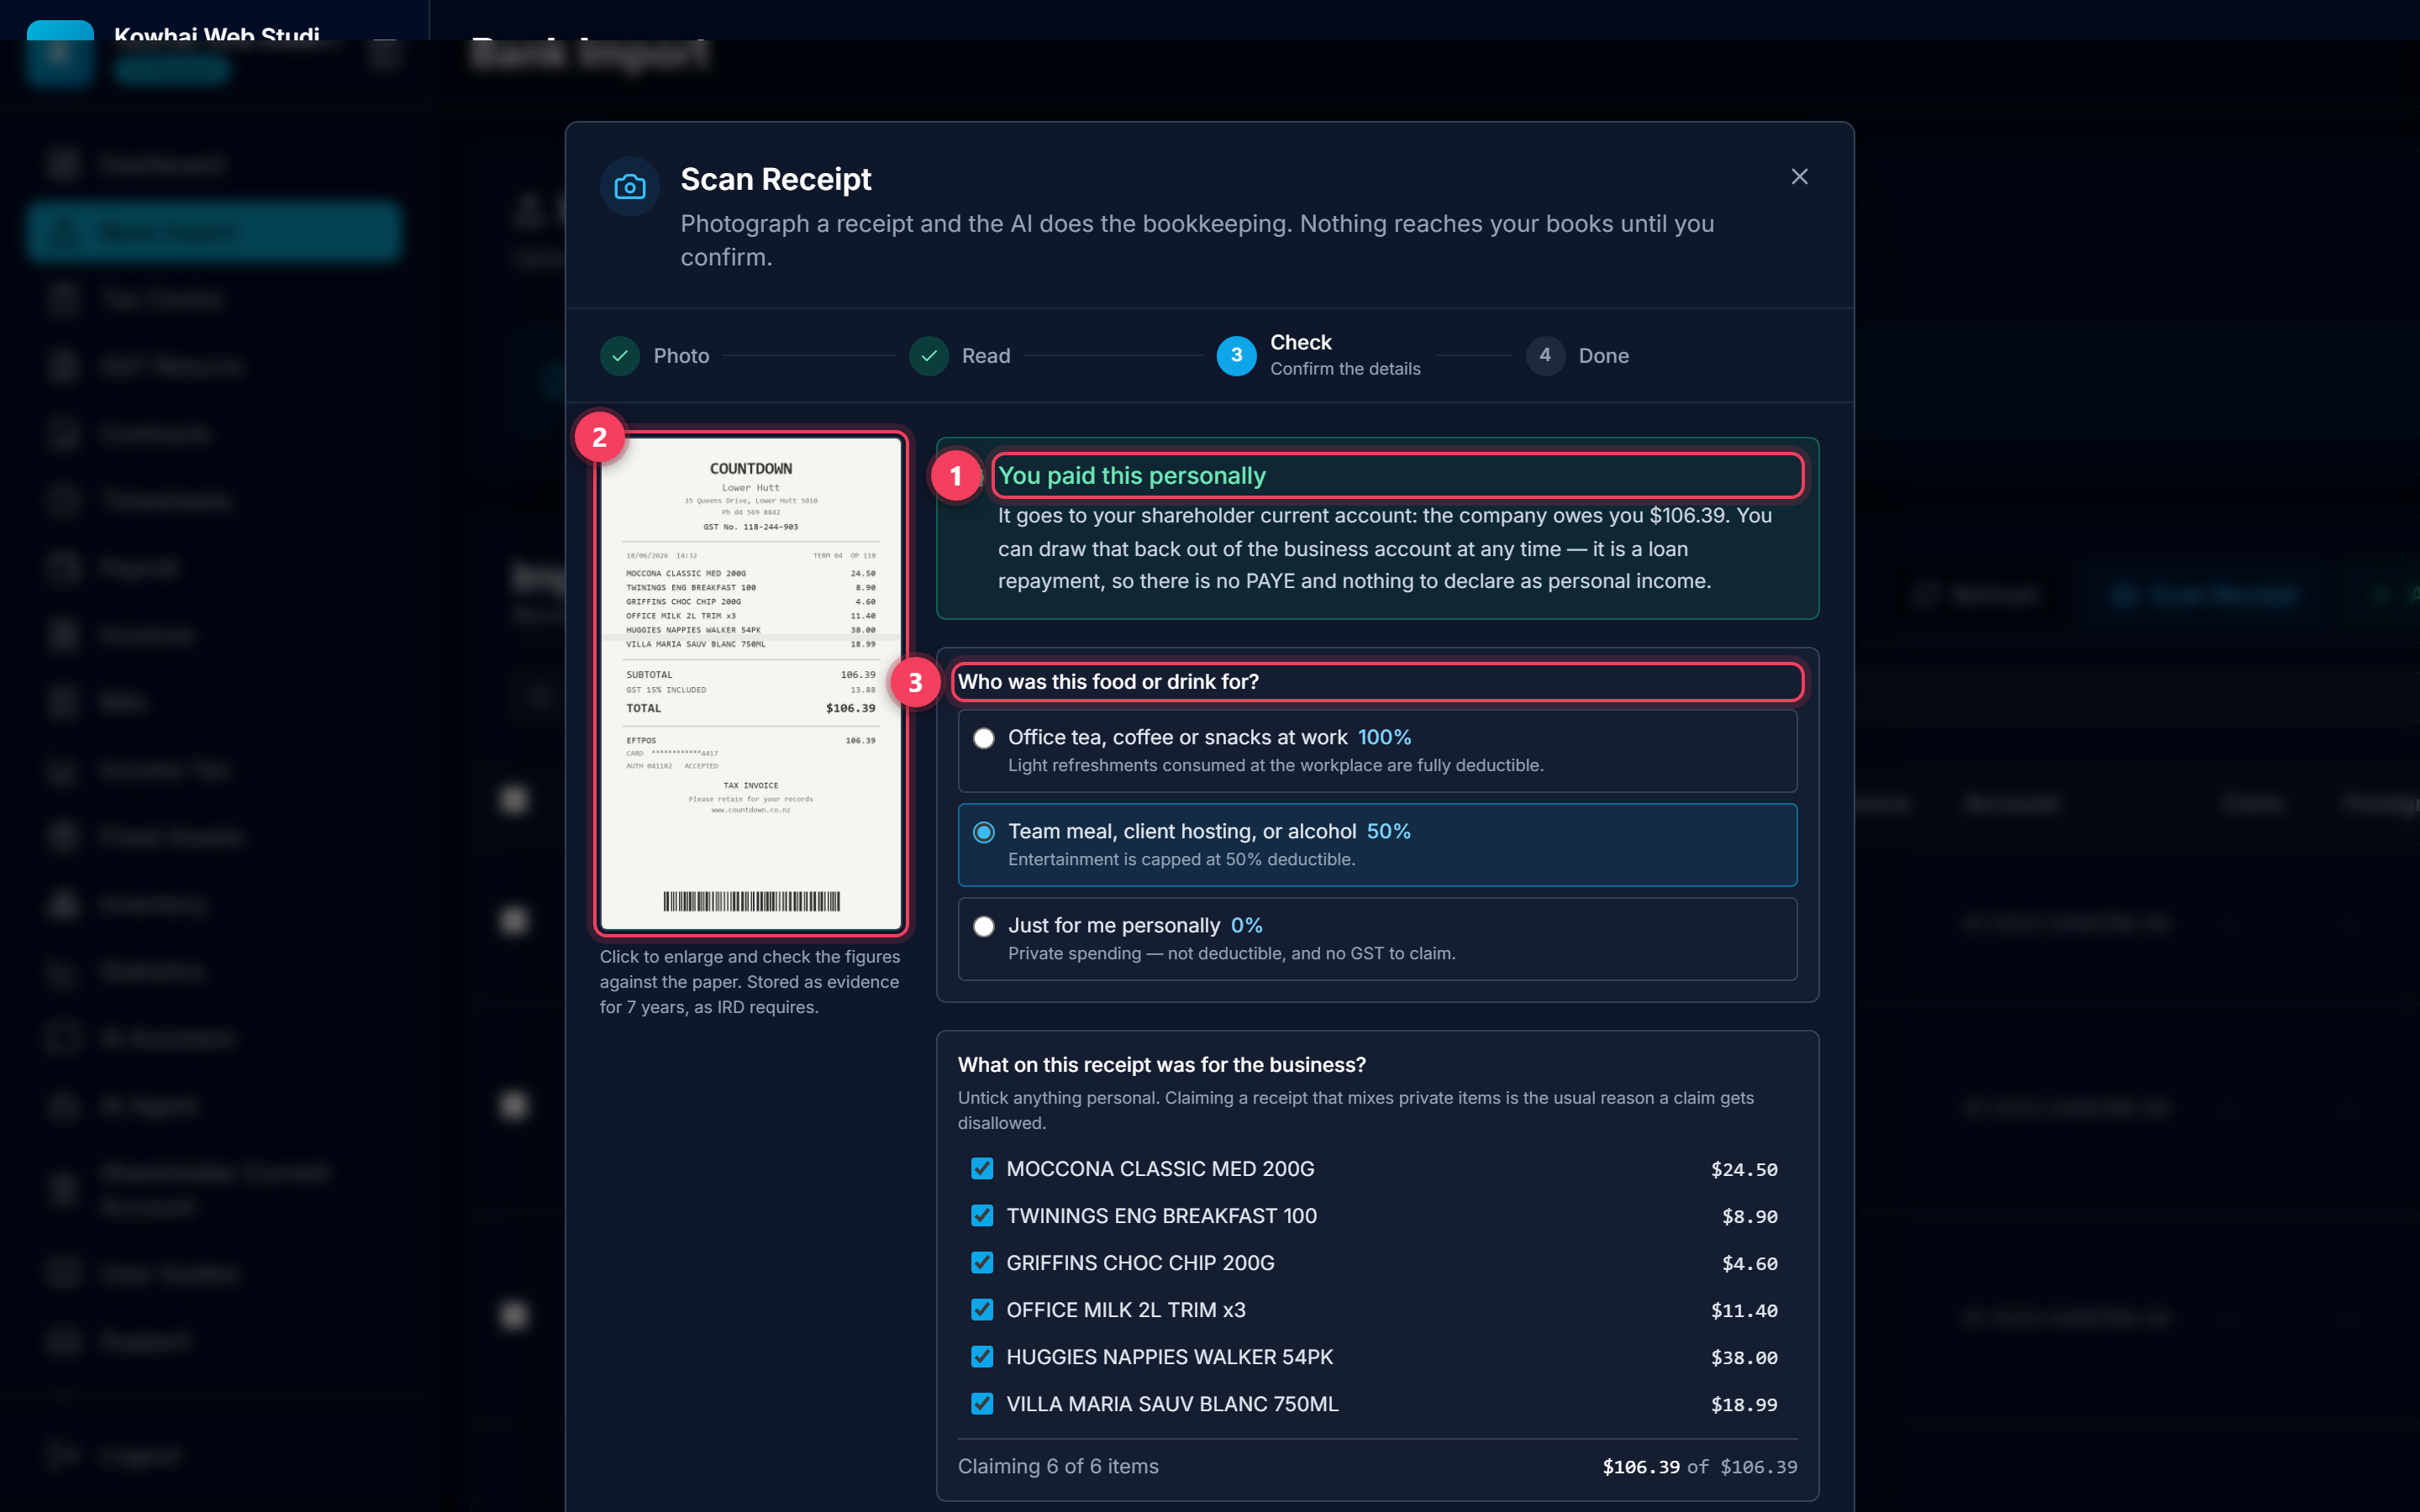
- The attribution card. Nothing on any bank feed matches this amount and date, so the company account did not pay it — you did. It goes to your shareholder current account, meaning the company owes you the money. Drawing it back out later is a loan repayment: no PAYE, and nothing to declare as personal income.
- The receipt itself, kept as evidence for seven years exactly as IRD requires. Click it to enlarge and zoom so you can check every figure against the paper.
- One question. Read on — this is the only thing a photo genuinely cannot answer.
Tip: If the spending IS already on your bank statement, the card says so instead and offers to attach the photo to that entry rather than booking the expense twice.
4. Answer the one question a photo cannot
Food and drink is the one category where the paperwork never tells the whole story. Under the entertainment rules the same supermarket docket is fully deductible as office refreshments, half deductible as a team dinner, and not deductible at all if it went home. Only you know which. So LedgerMind asks once, in plain English, instead of expecting you to know the rule.
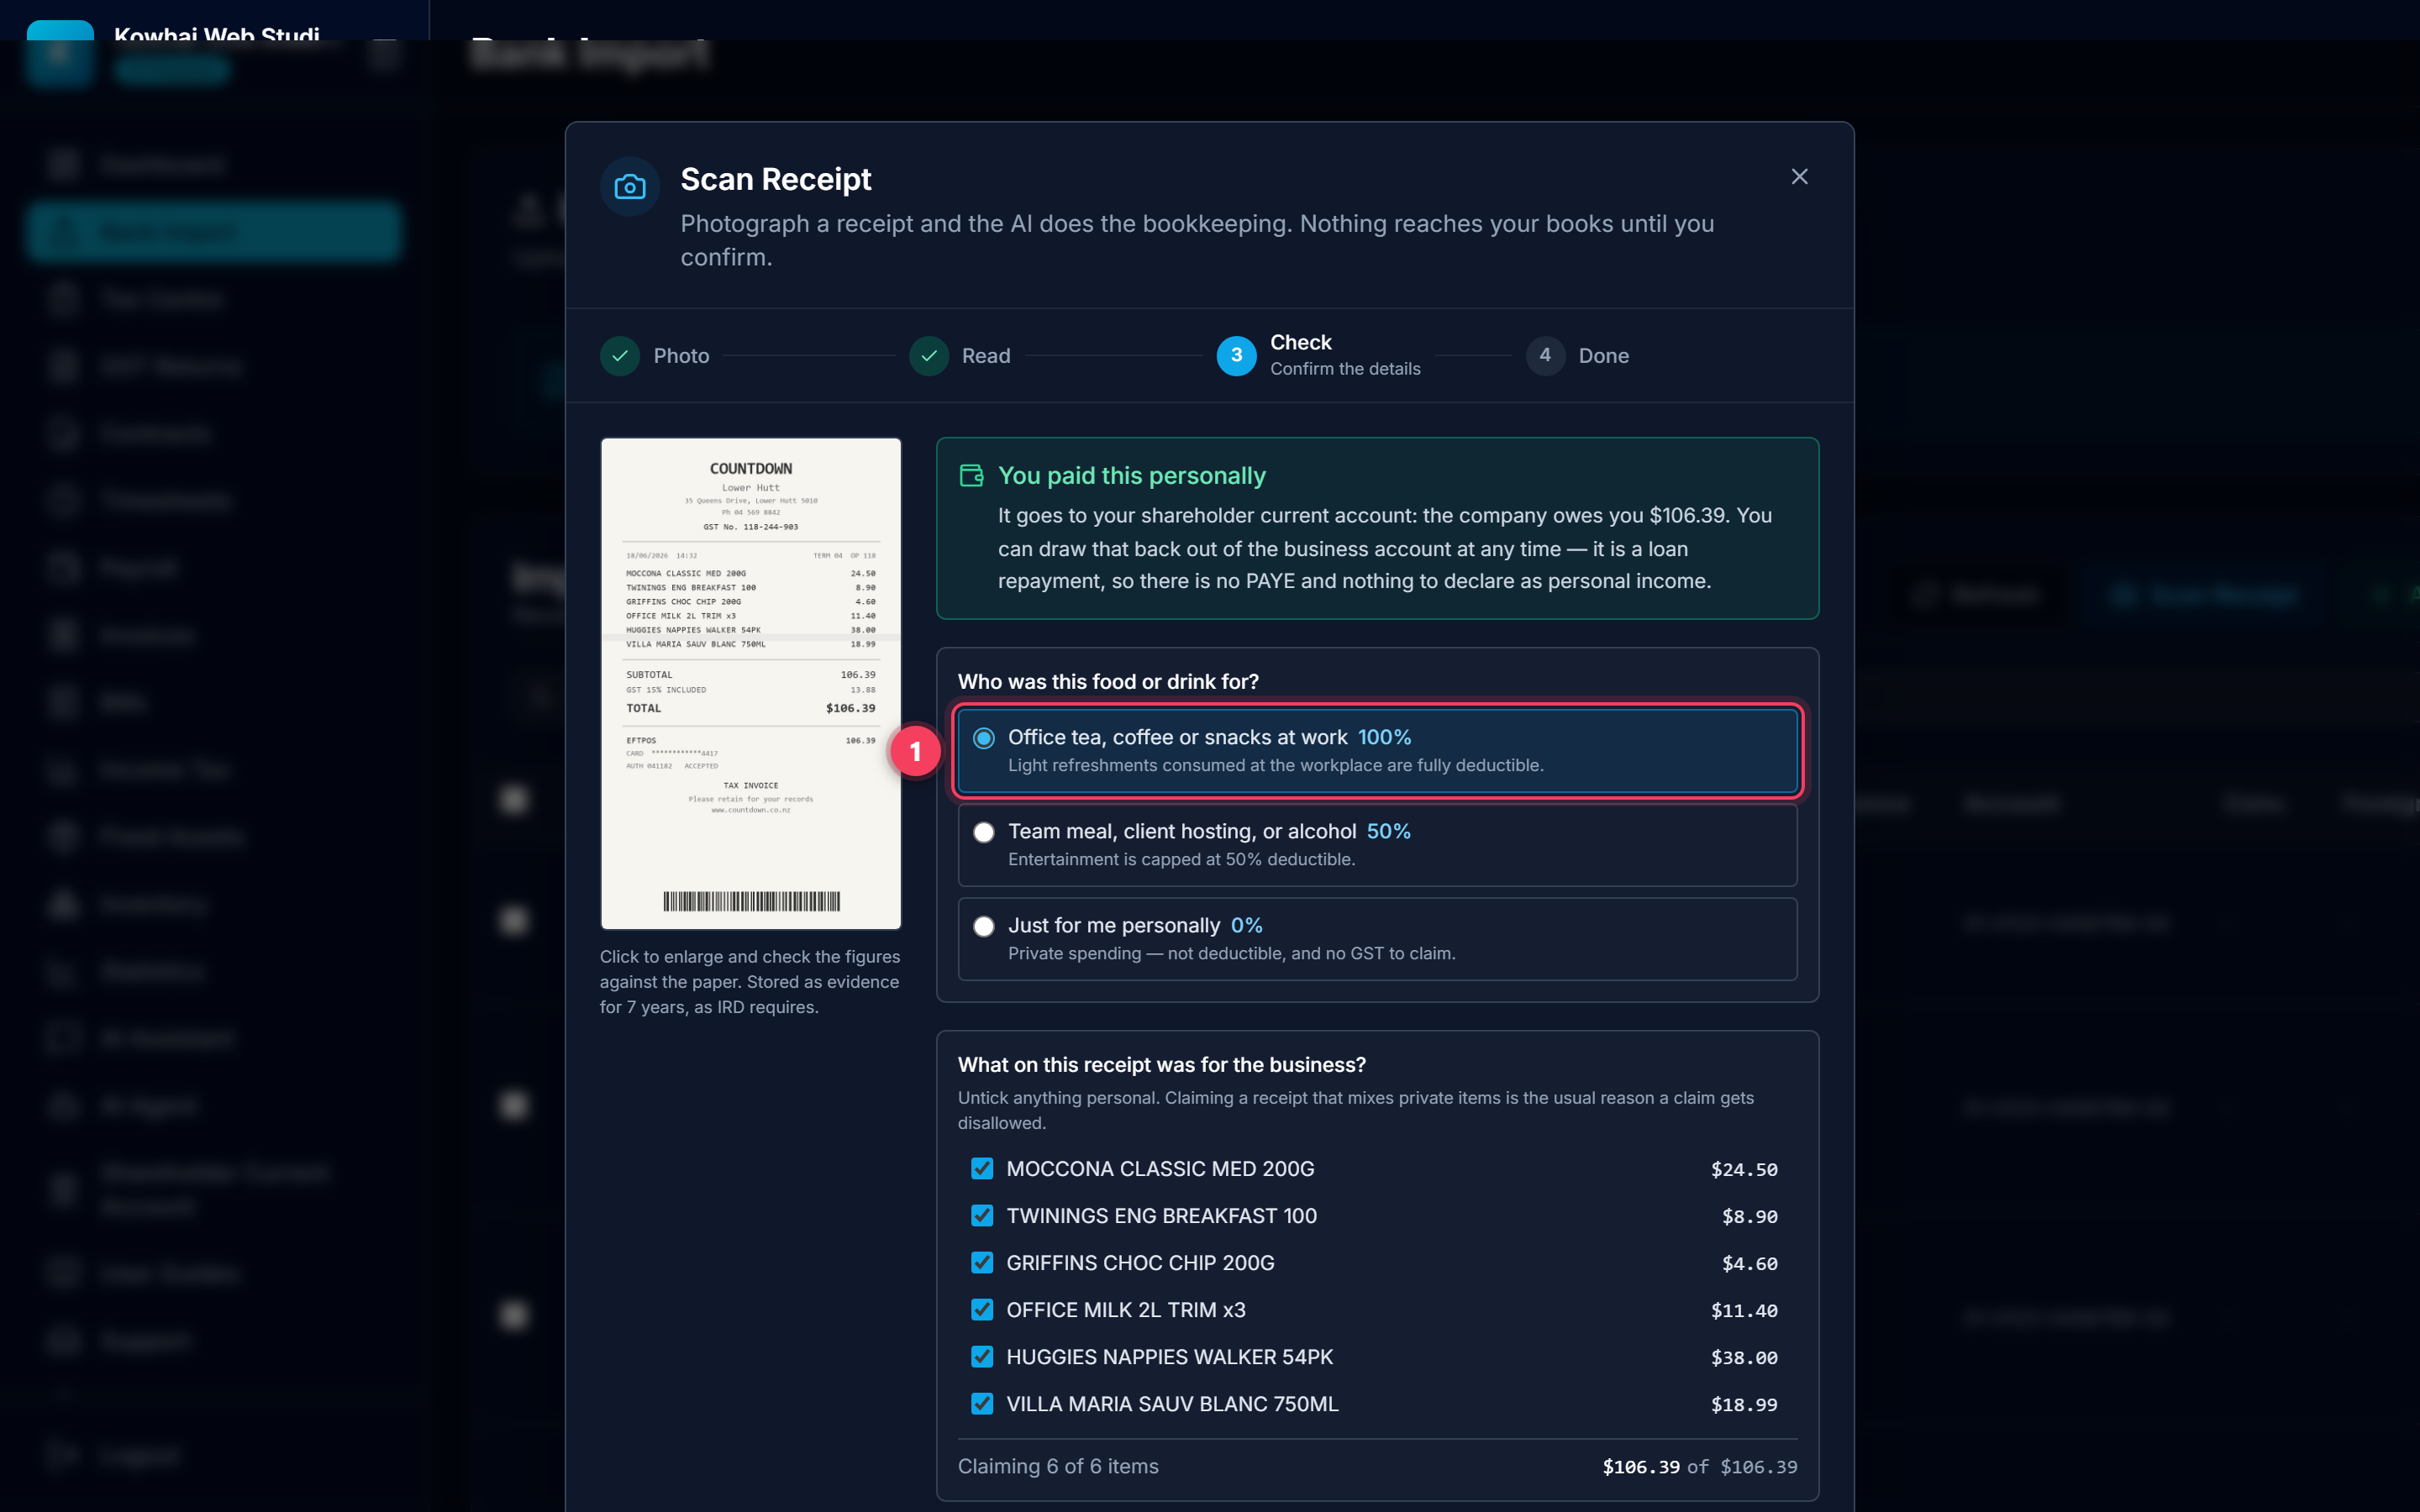
- This receipt is coffee, tea, biscuits and milk for the office kitchen, so "Office tea, coffee or snacks at work" is the right answer — light refreshments consumed at the workplace are 100% deductible.
Tip: Your answer rewrites three things at once: the category, the deductible percentage and the claimable GST. Pick "Team meal, client hosting, or alcohol" and the claim drops to 50%; pick "Just for me personally" and it drops to nothing, with no GST claimed. This question only appears when the AI sees food or drink.
5. Untick anything personal
A supermarket run usually mixes the office supplies with the household shop. Claiming the whole docket is the single most common reason a claim gets thrown out in an audit — so split it here, on the spot, while you still remember what was what.
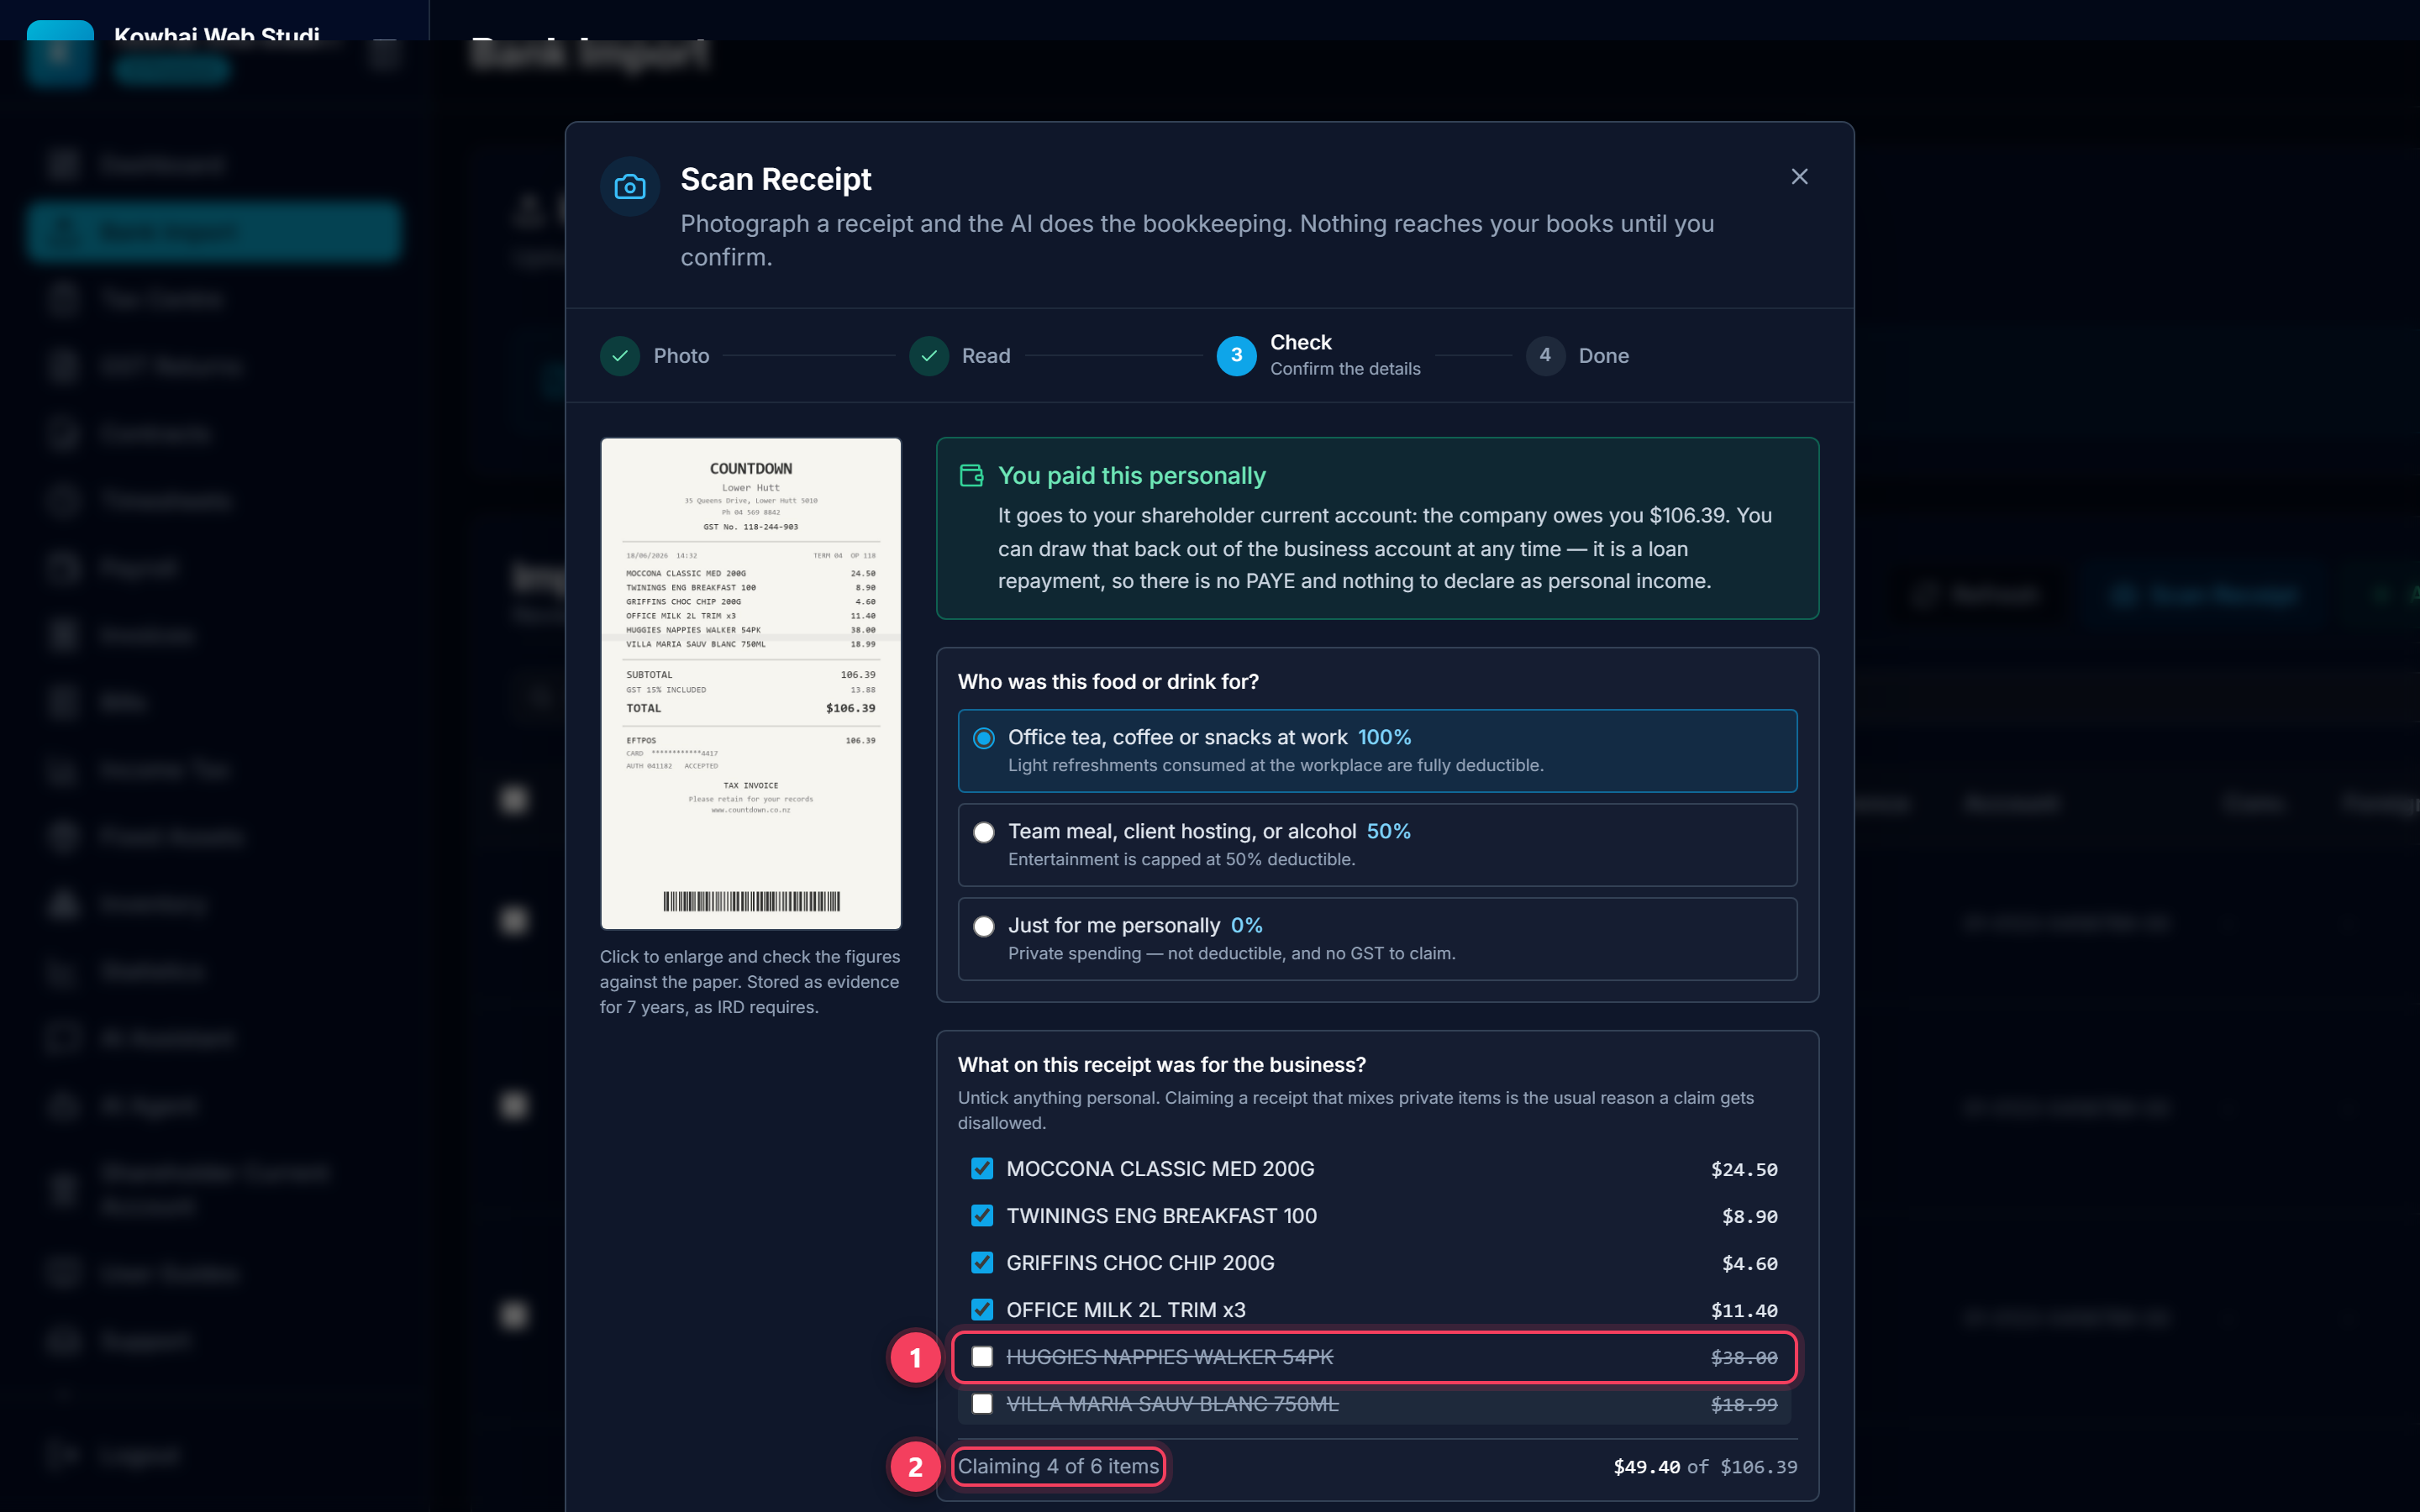
- Untick the private items. They stay visible, struck through, so it is obvious what was deliberately excluded.
- The running total updates as you go — 4 of 6 items, $49.40 of the $106.39 on the paper. The GST rescales with it automatically.
Tip: Both the claimed and the excluded lines are stored against the entry. If IRD ever asks why you claimed $49.40 off a $106.39 receipt, the answer is already recorded — you are not relying on memory.
6. Check the four figures that matter
Everything below is pre-filled from the receipt. Glance over it, correct anything the photo made hard to read, and you are done. Every field is editable.
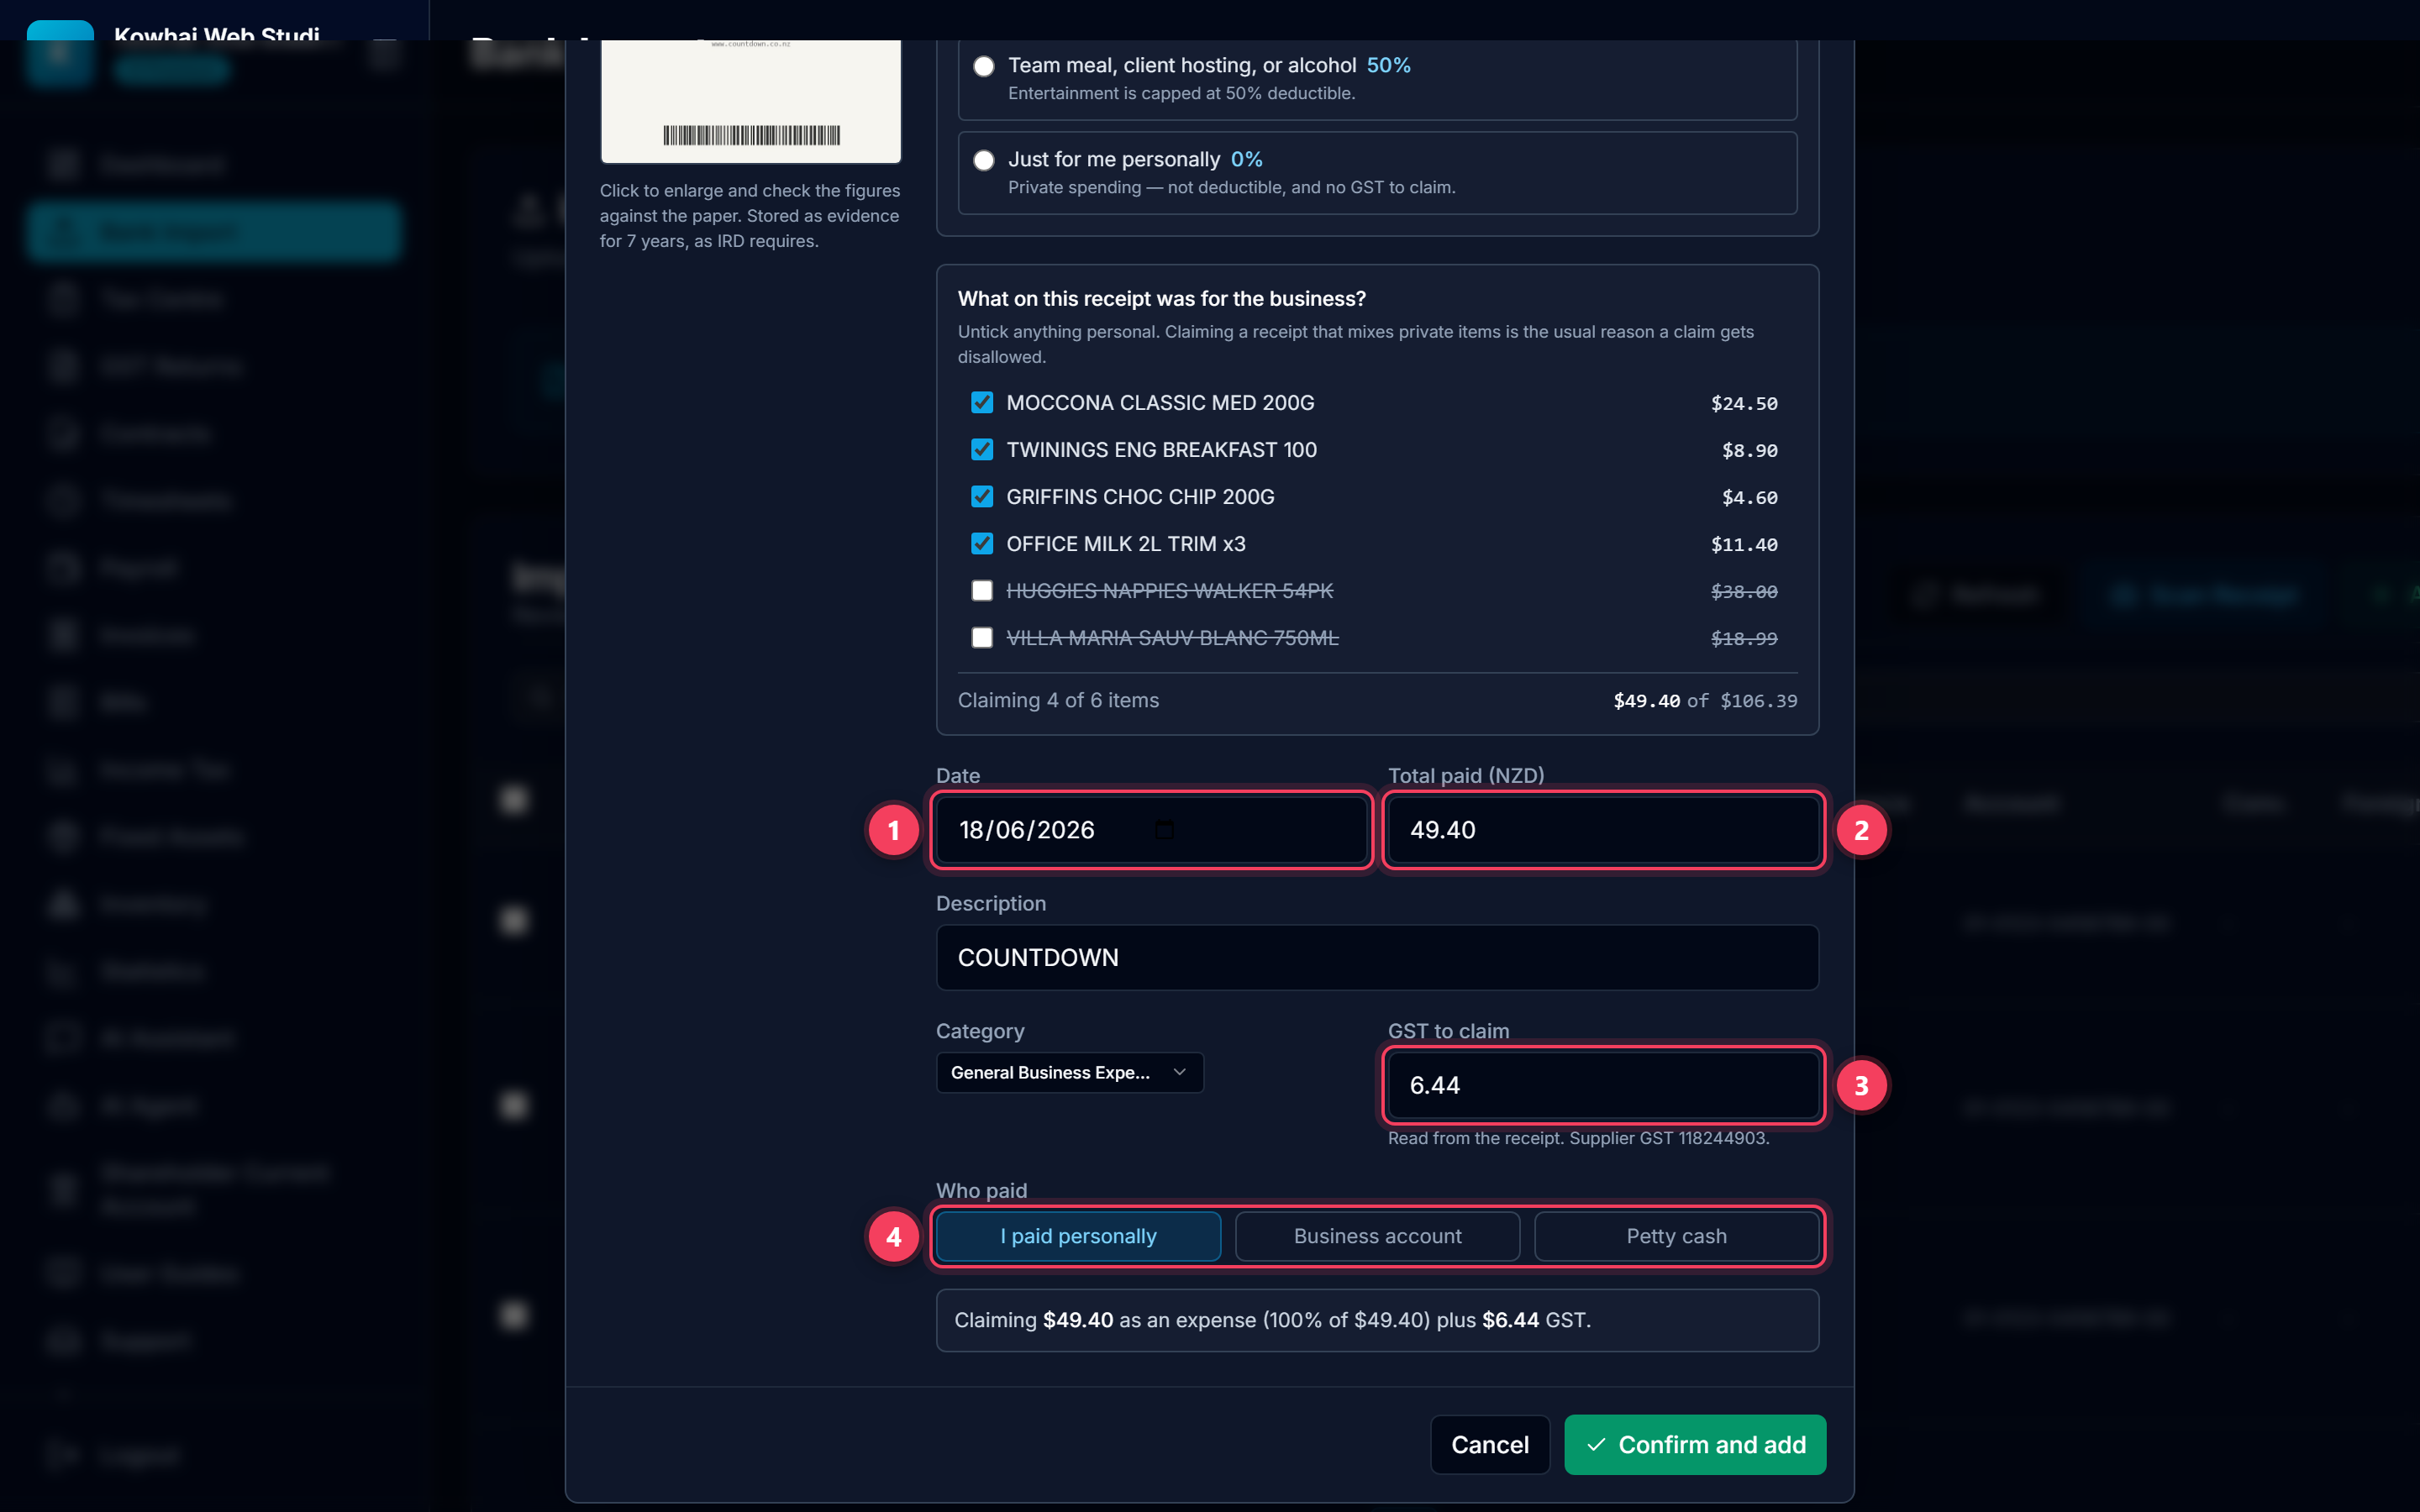
- Date — read off the receipt, not today. New Zealand dockets are day-first, so 18/06/2026 is 18 June. Check it if the print was faint: the date decides which GST return this lands in.
- Total paid — this is the split total, not the whole docket. It dropped to $49.40 when you unticked the private items.
- GST to claim — taken from the GST printed on the receipt and rescaled to the part you claimed. The line underneath shows the supplier GST number that was found, which is what makes the GST claimable at all.
- Who paid — defaults to "I paid personally", which is what sends it to your shareholder current account. Switch it to Business account or Petty cash if that is wrong.
Tip: No supplier GST number on a receipt over $50? LedgerMind sets the GST to $0 and warns you, rather than quietly claiming tax you are not entitled to. Over $1,000 it also reminds you that the receipt must show your own company name and address to be a valid tax invoice.
7. Confirm
One last plain-English summary of exactly what is about to be claimed.
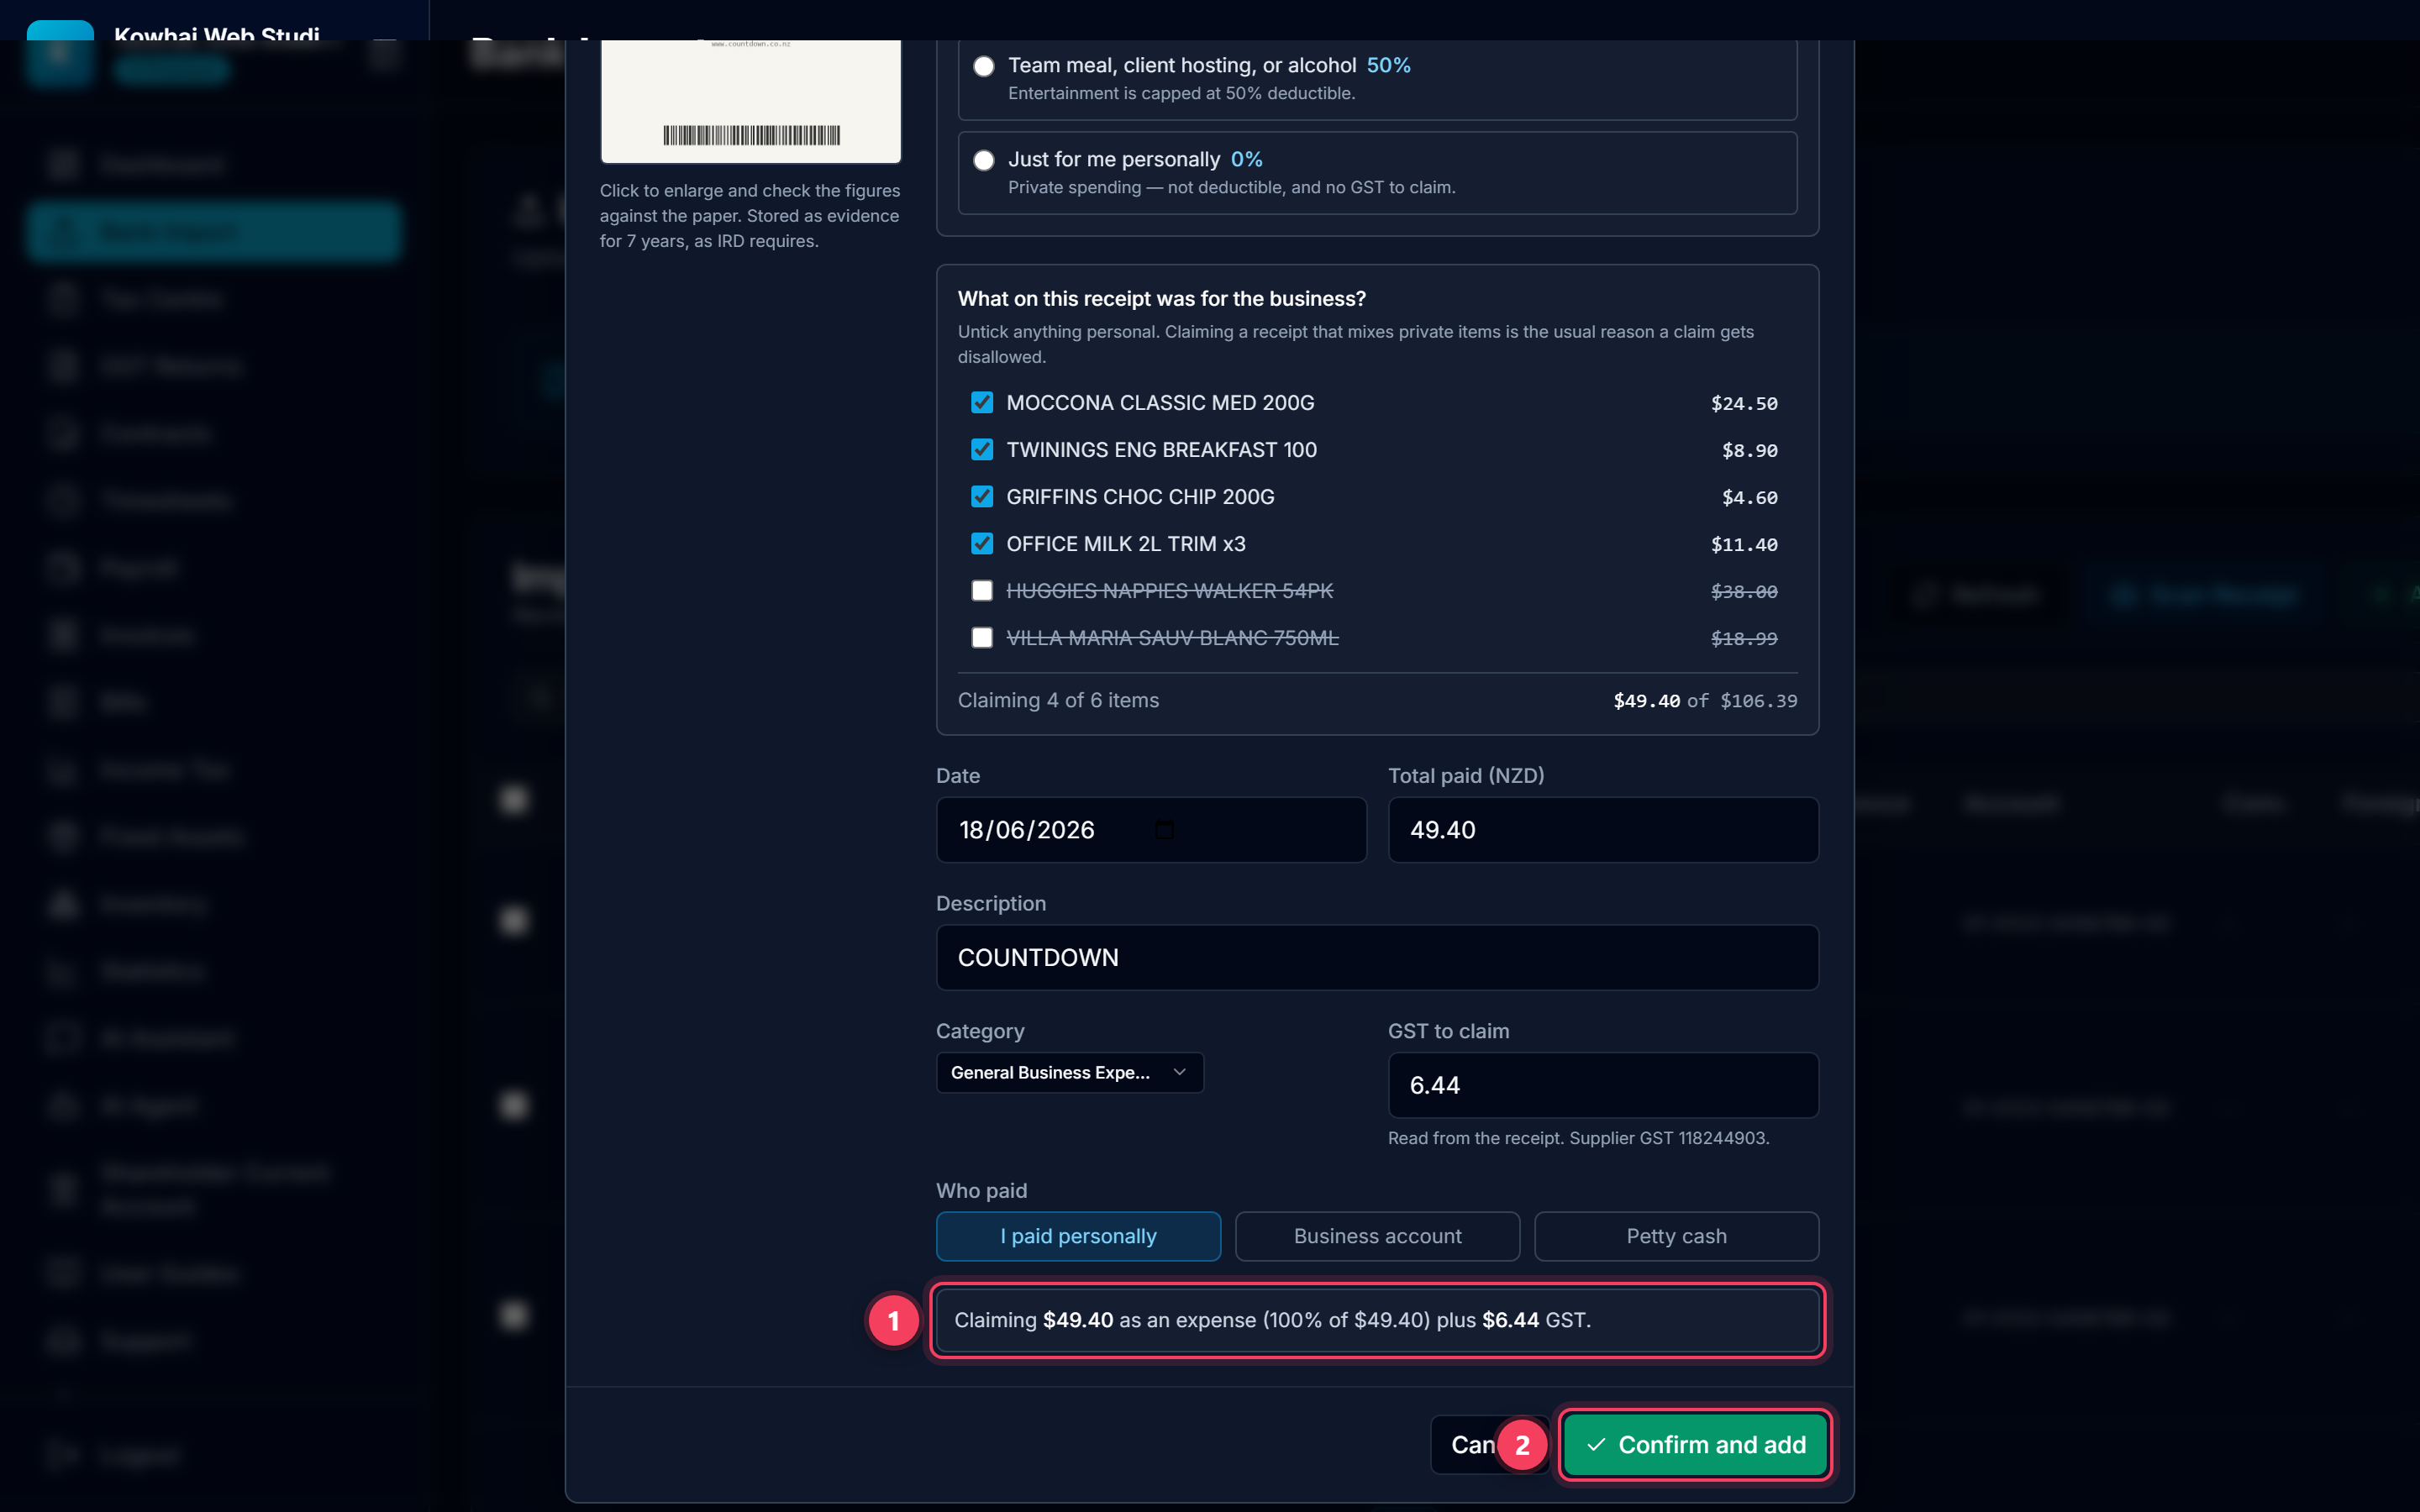
- The summary spells out the whole calculation: $49.40 as an expense at 100%, plus $6.44 of GST.
- Confirm and add writes the entry. This is the first moment anything touches your books.
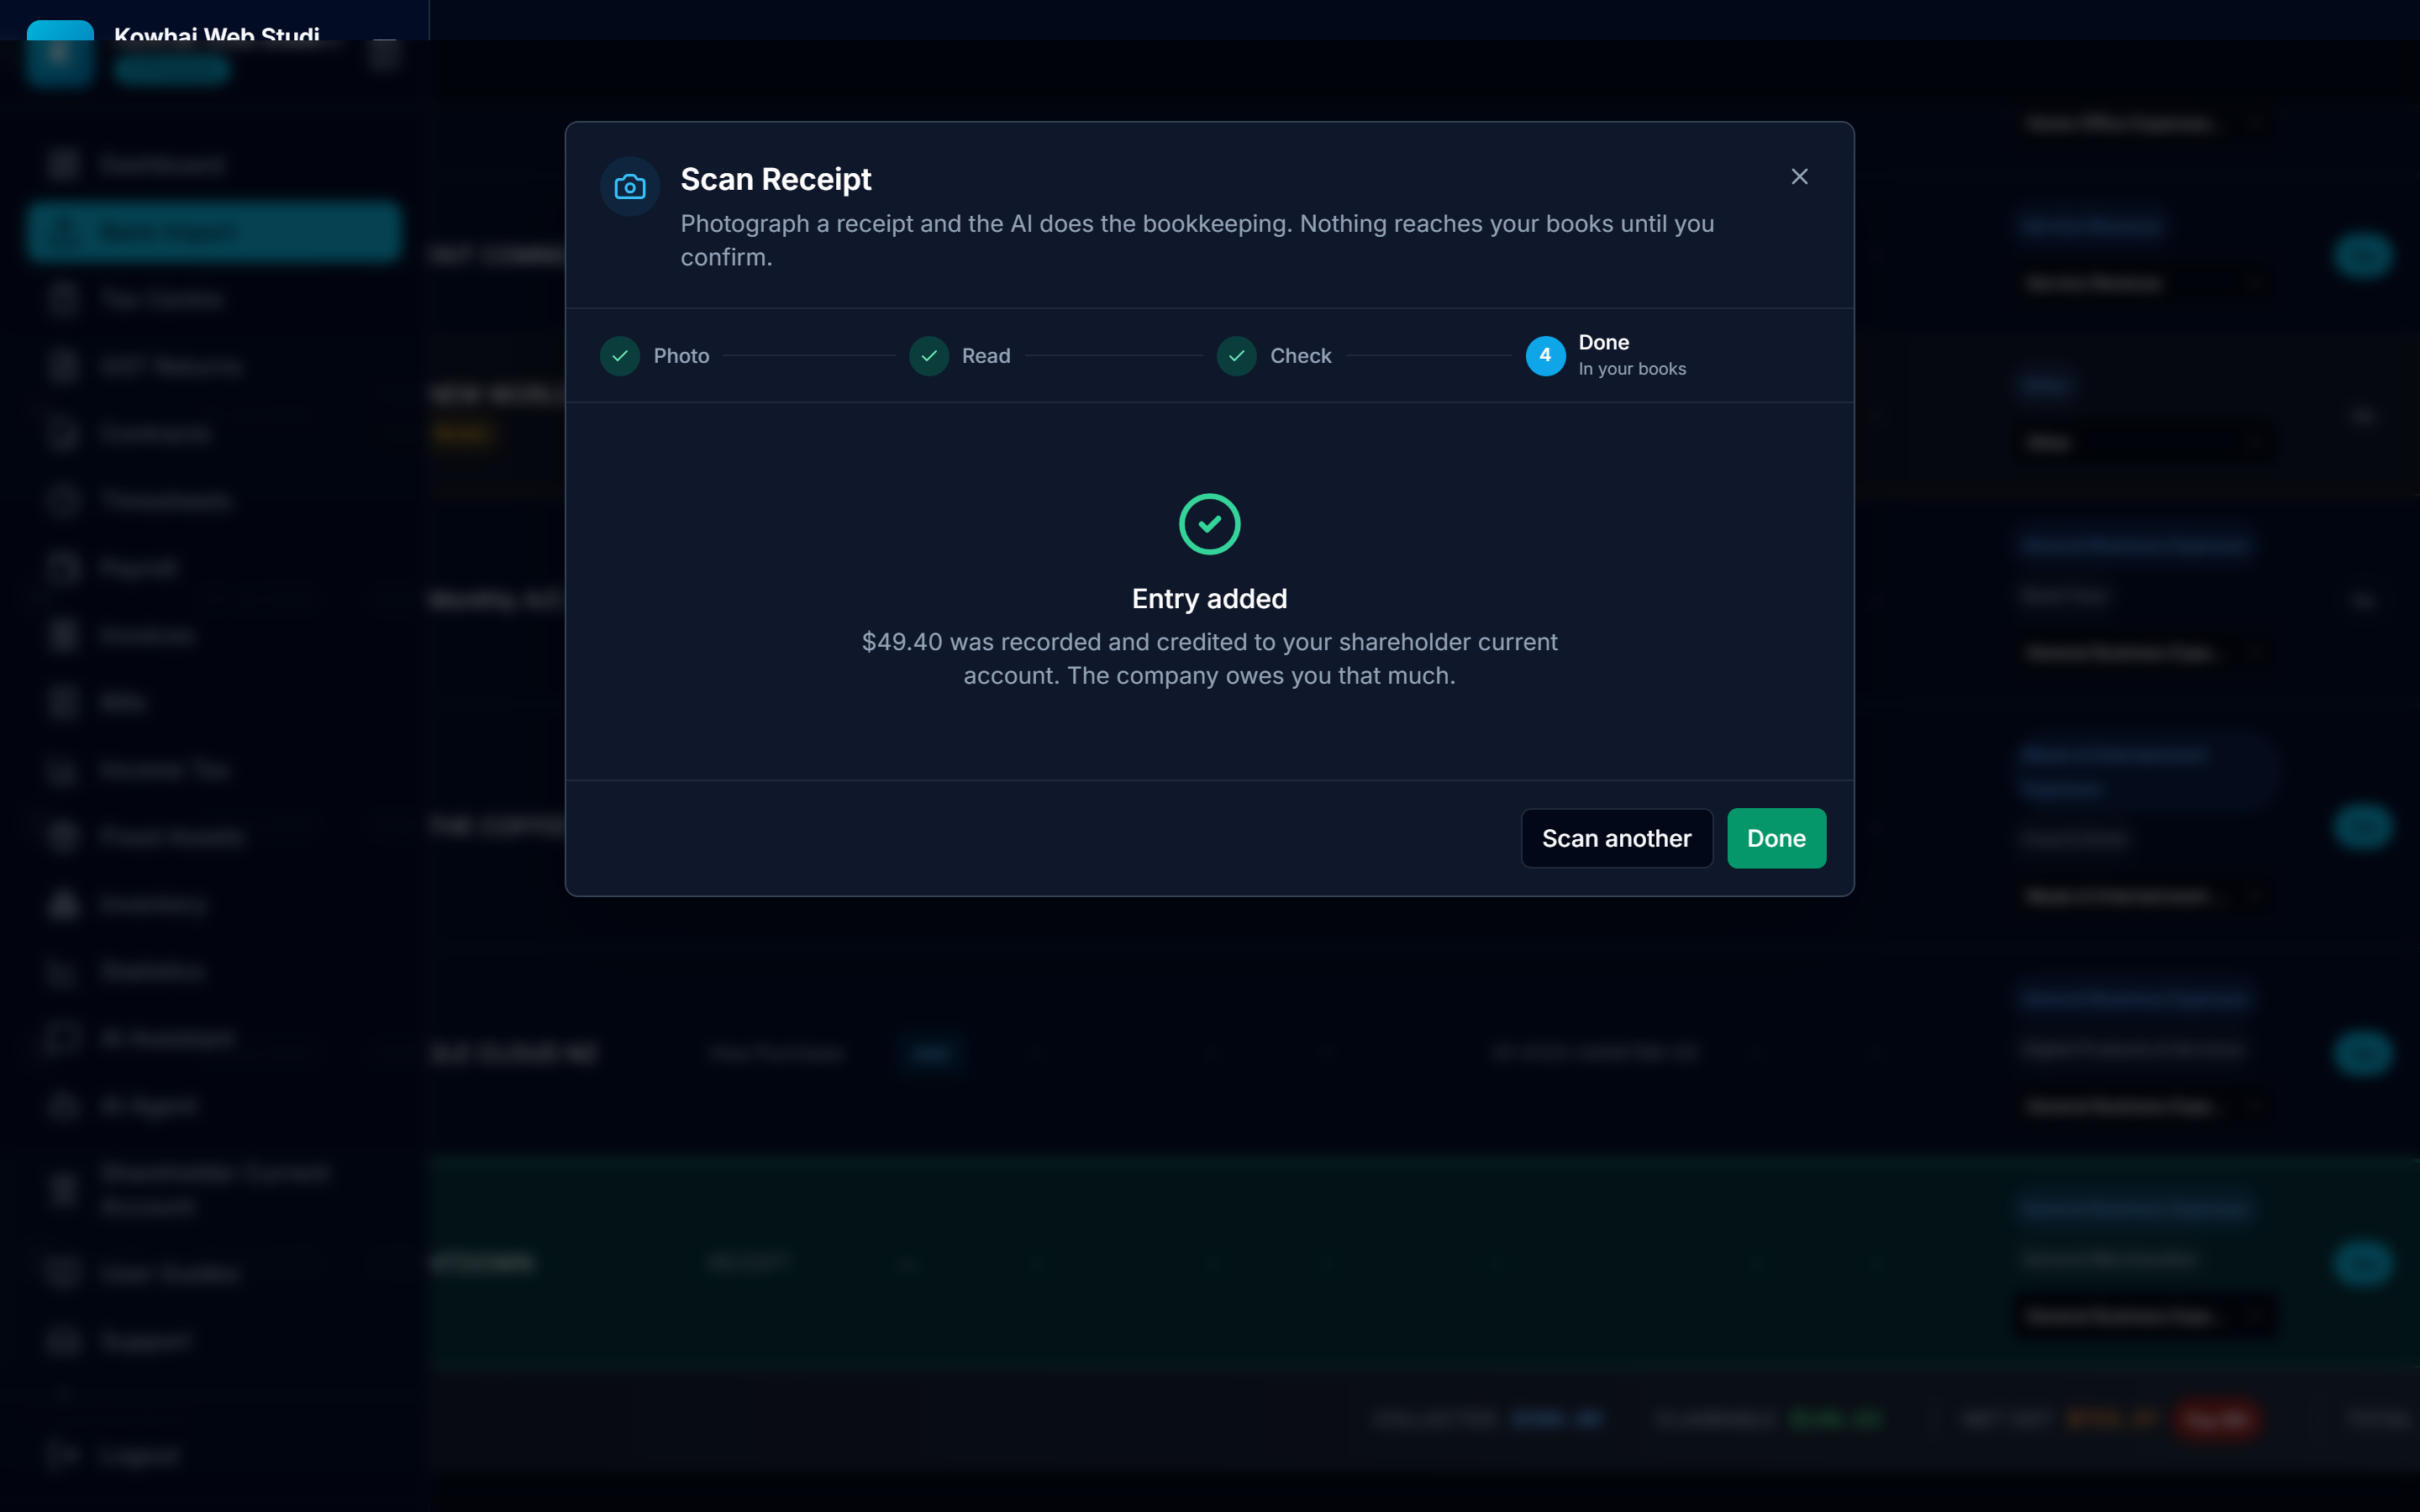
8. Done
The confirmation tells you where the money went — in this case straight onto your shareholder current account, so the company now owes you $49.40. Scan another straight away, or close the wizard.
9. Find it in your books
Entries sort by the date on the receipt, not by when you scanned them — so a docket from two months ago lands well down the list. LedgerMind jumps straight to it and flashes it green so you never have to go hunting.
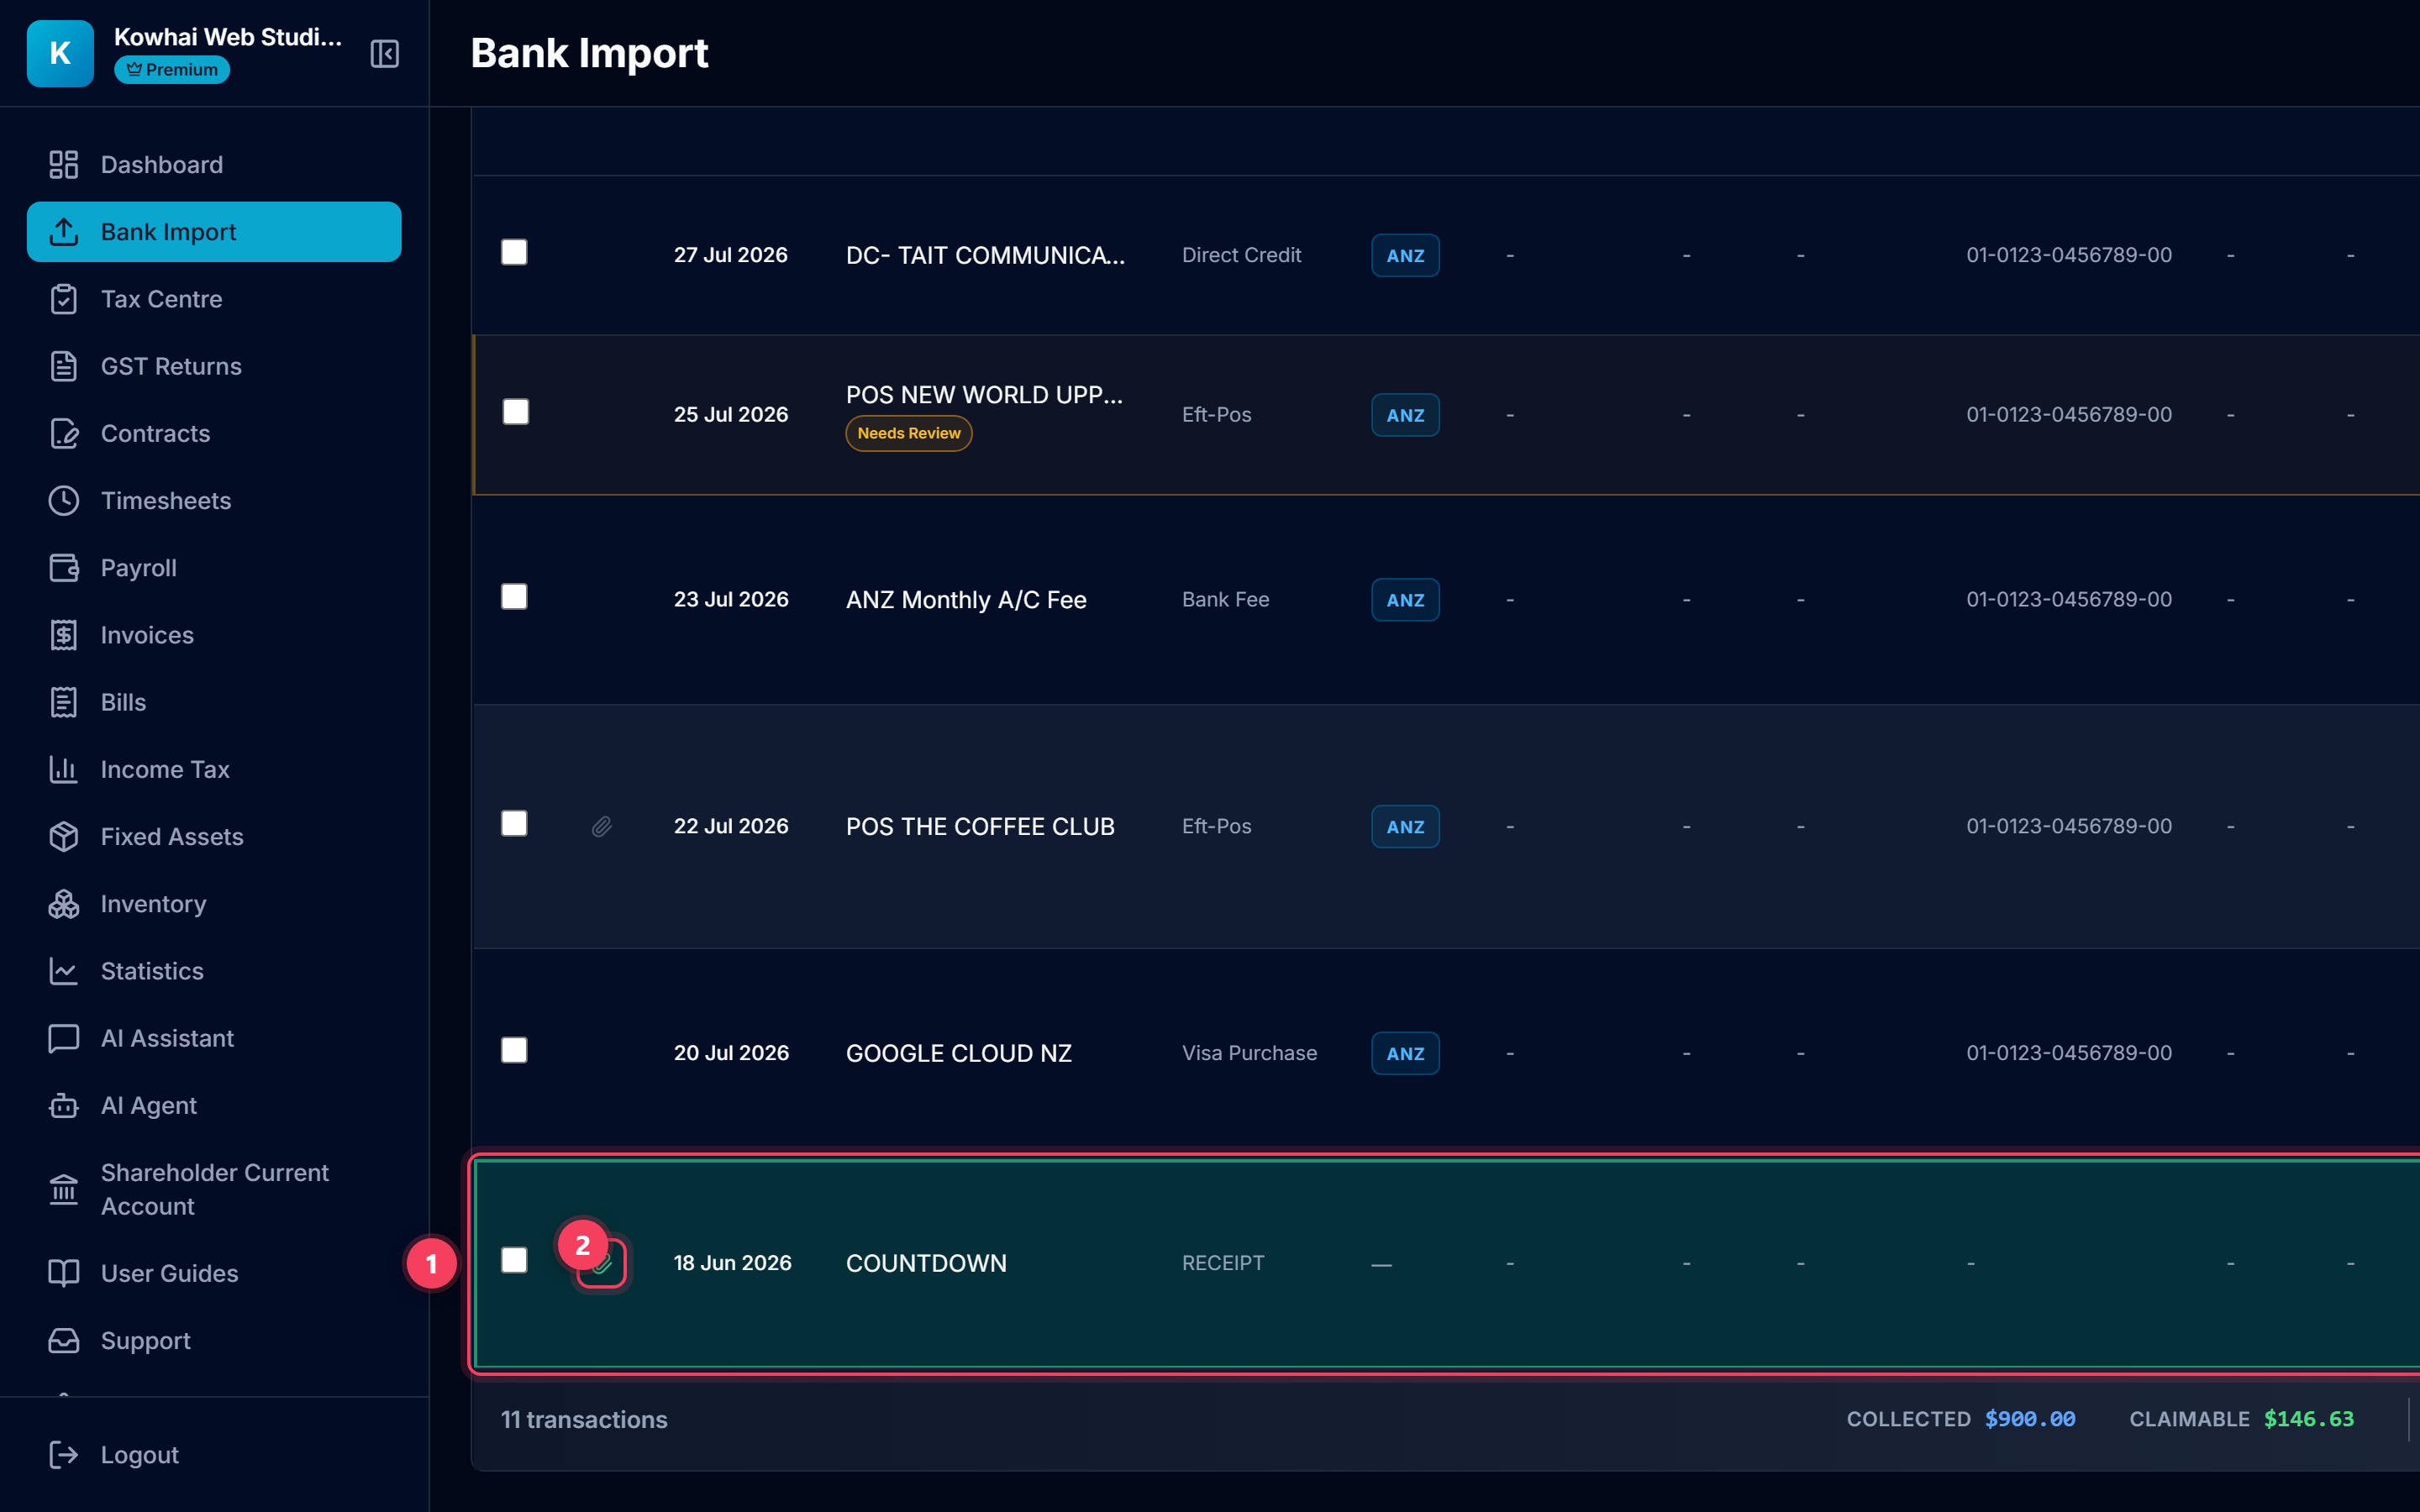
- Your new entry, highlighted. Its Type reads RECEIPT and its Source is blank, because no bank account was involved — that is what tells you at a glance it came off a docket rather than a statement.
- The green paperclip. This entry has its evidence attached.
Tip: Lost it anyway? Type the shop name into the search box at the top of the list, or use the Refresh button to reload from the server.
10. The evidence, whenever you need it
Click any green paperclip to see the receipt behind that entry. This is the whole point of the exercise: seven years from now, when someone asks what a line in your accounts was for, the answer is one click away instead of in a shoebox.
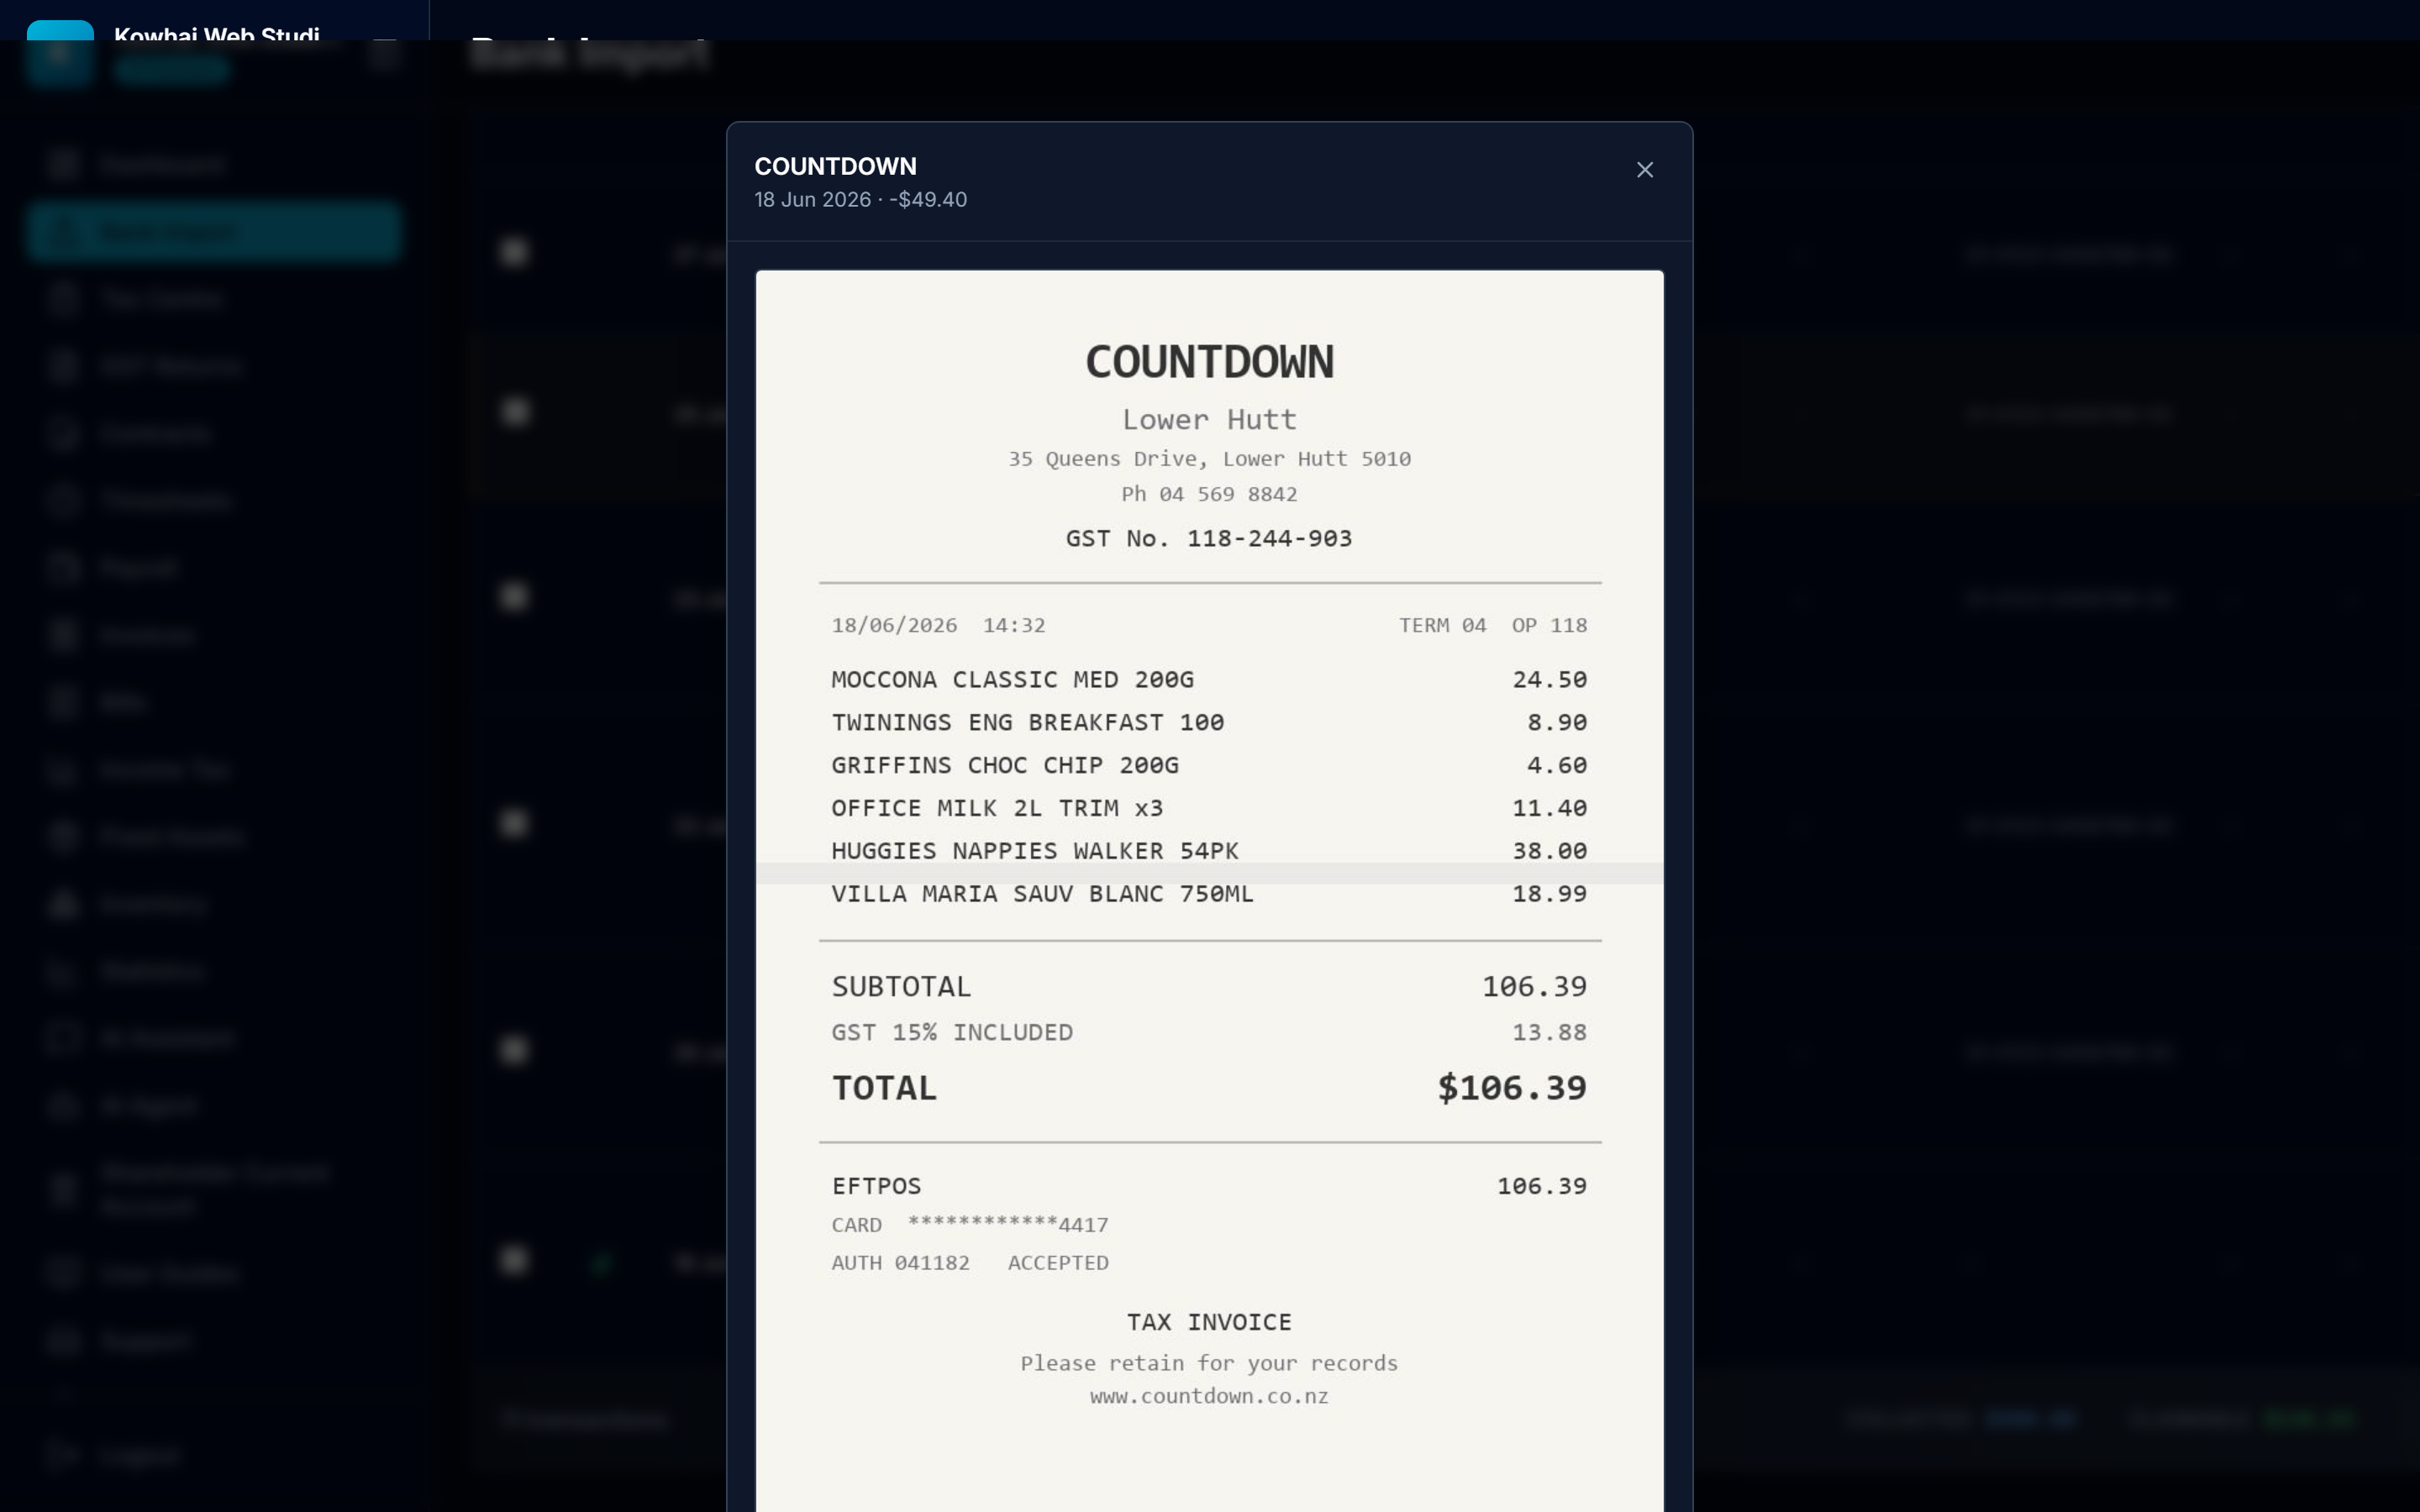
Tip: Click the image again to zoom and pan, or open the original full size in a new tab.
Common questions
Is it actually legal to claim something I paid for with my own card?
Yes, and it is completely routine for a small company. The company is a separate legal entity: when you pay for something on its behalf, the company owes you the money. That sits in your shareholder current account and you can draw it back out of the business account whenever you like. Because it is a repayment of what you lent the company, there is no PAYE and it is not personal income. What matters is the substance of the spending, not which card was tapped.
Will this double up with a transaction from my bank feed?
No. Before anything is written, LedgerMind looks for an existing entry with the same amount within a few days. If it finds one, it offers to attach the photo to that entry as evidence instead of creating a second expense. It also fingerprints the image itself, so scanning the same receipt twice is caught even months later.
What if the AI reads a figure wrong?
Correct it — every field on the Check step is editable, and nothing is saved until you press Confirm. Click the receipt thumbnail to enlarge and zoom so you can compare against the paper. If the photo is too blurred to read at all, LedgerMind says so and you can simply type the four figures in.
Why did it claim $0 of GST when the receipt clearly shows GST?
Almost always because no supplier GST number could be read. For a purchase over $50 you need the supplier's GST number on the document to claim the input tax, so LedgerMind zeroes it and warns you rather than claiming tax you cannot support. If the number is on the paper but was missed, type it in and set the GST yourself.
I already have hundreds of bank transactions with no receipts. Can I add them retrospectively?
Yes. Hover any row without a receipt and a faint paperclip appears on the left. Click it and the wizard opens in attach mode: the date, amount and description stay locked to the bank entry and only the photo is stored. None of your existing figures change.
How long are the images kept, and where?
They are stored with your account for the seven years IRD requires records to be kept, and are only visible to you. Images are compressed on the way in, so a large camera photo becomes a few hundred kilobytes without losing the print.